Screen 100+ Candidates in 36 Hours (Not 3 Weeks)
Time Investment: 1-2 hours setup | Monthly Cost: $81-127 | Time Saved: 50+ hours per hiring cycle
Overview
What This Does
This system automates the first round of candidate screening using an AI voice agent that:
- Sends candidates a link to call an AI screener
- Conducts 10-minute verbal phone screens
- Asks consistent, structured questions
- Records transcripts and audio
- Collects structured data for easy review
The Results
Traditional Approach:
- 61 hours of manual work
- 3-4 weeks of calendar time
- Decision fatigue by candidate #73
- Inconsistent evaluation criteria
AI-Powered Approach:
- 10 hours total (1-2 hrs setup + 6 hrs review + 2 hrs decisions)
- 1.5 days of calendar time
- Fresh judgment for every candidate
- Perfectly consistent screening
When to Use This
✅ Great for:
- High-volume hiring (50+ applications)
- Remote/distributed roles
- Initial screening for basic qualifications
- Roles with clear requirements
- When speed matters
❌ Not ideal for:
- Executive/C-suite hiring
- Highly sensitive roles
- Very small candidate pools (<10 people)
Prerequisites
Required Accounts & Tools
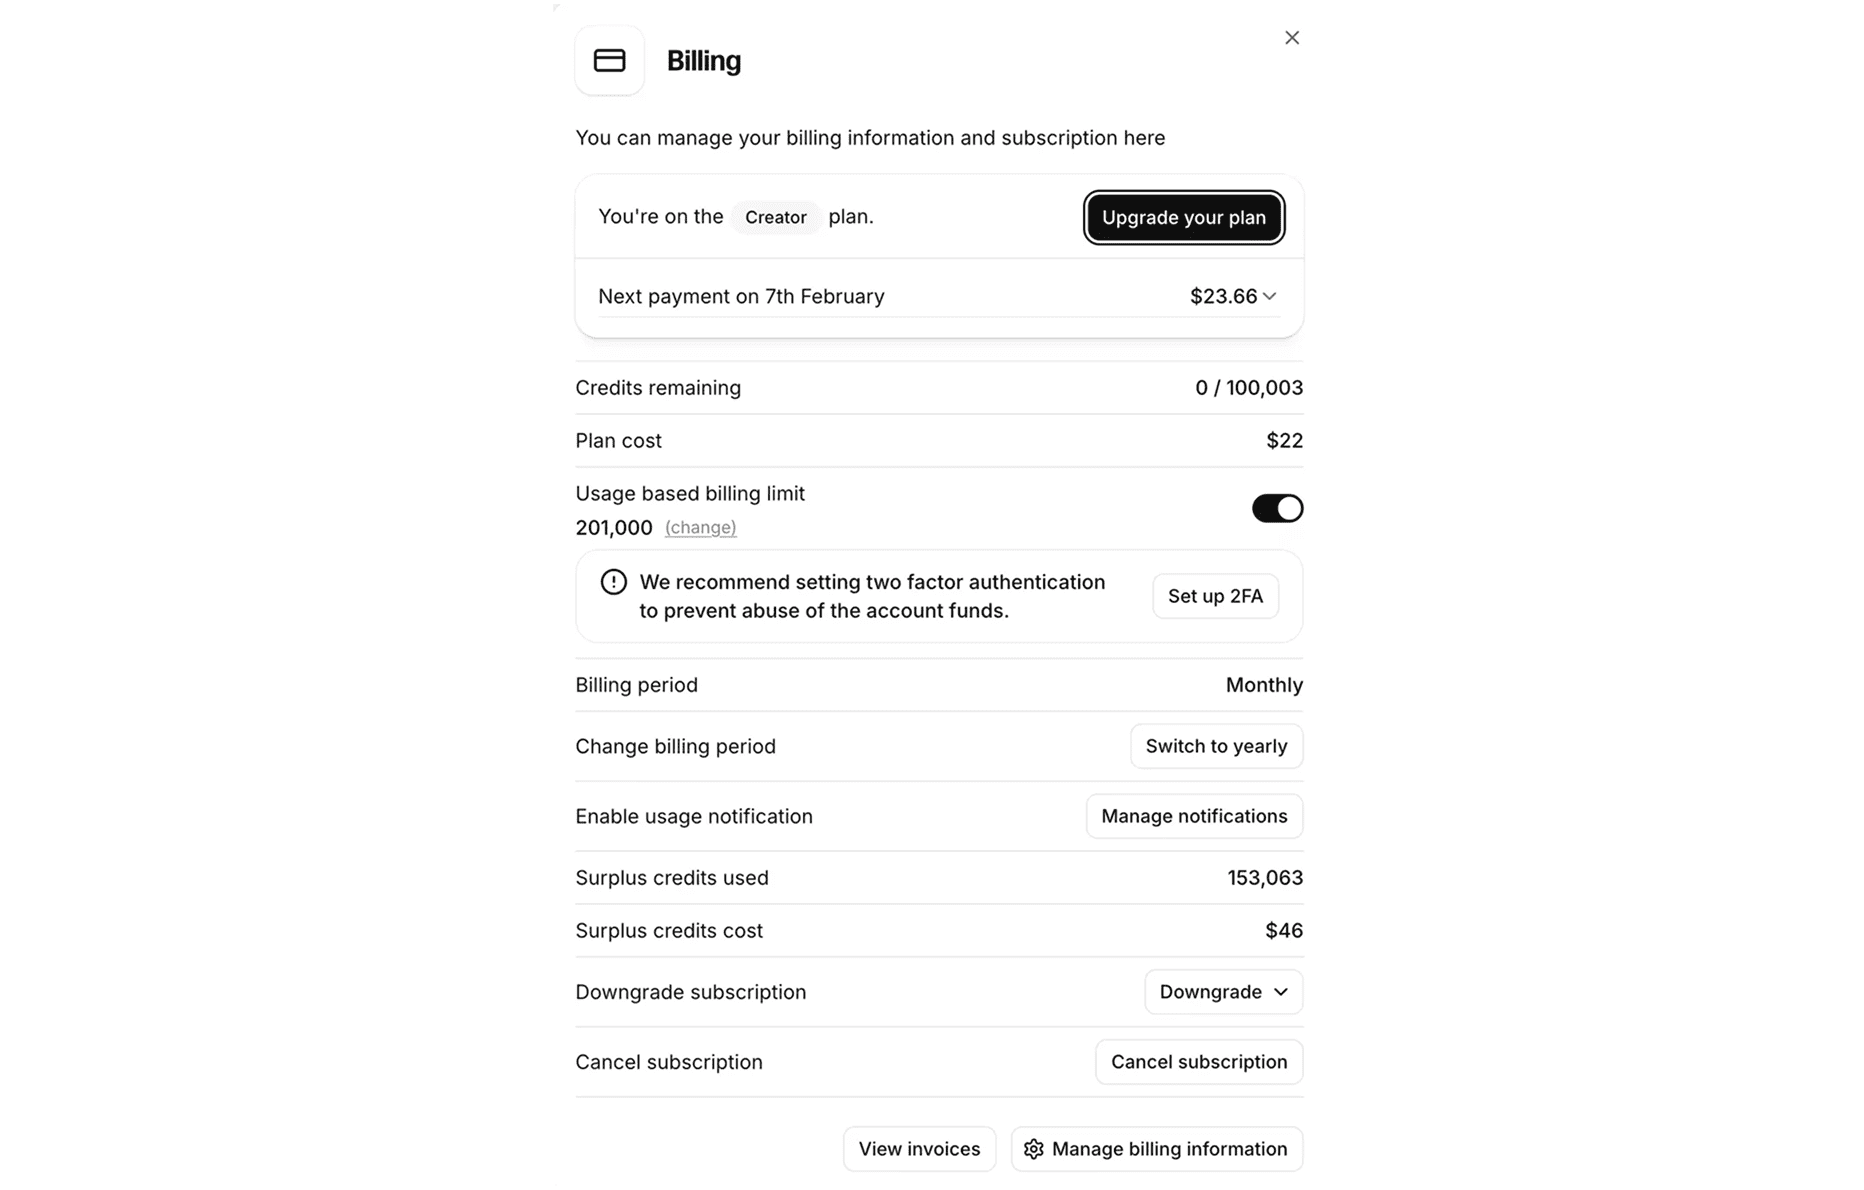
Total Monthly Cost: ~$81 base + overage for heavy usage
💡 Real Usage Example: For 100 screening calls, actual cost was $22 (Creator plan) + $46 overage = $68 for ElevenLabs. Total system cost: ~$127. Creator works well for occasional hiring, upgrade to Turbo ($44/mo) for continuous recruiting.
Skills Needed
- ⭐ Basic: Copy/paste, follow instructions
- No coding required
Time Required
- Initial Setup: 1-2 hours
- Per Candidate Review: 3-5 minutes
- Ongoing Maintenance: ~30 mins/week
Architecture & Flow
System Overview
[Job Applications in Notion]
    ↓
[You Review & Approve for Screening]
    ↓
[Click "Send Email" Button in Notion]
    ↓
[Zapier Sends Email with Screening Link]
    ↓
[Candidate Clicks Link & Calls AI Agent]
    ↓ (10-min phone screen)
[AI Records Conversation & Collects Data]
    ↓
[You Review in ElevenLabs Analysis Dashboard]
    ↓
[Make Hiring Decision]
Data Flow
- Applications come in → Captured in Notion
- You do sanity review → Filter obvious rejections
- Approved candidates → Click button to send screening link
- Zapier triggers → Sends personalized email with link
- Candidate completes AI call → Data collected in ElevenLabs
- You review in ElevenLabs → Listen to recordings, read transcripts
- Make decision → Move forward or reject
Key Decision Points
The AI Handles:
- ✅ Conducting consistent screening calls
- ✅ Basic qualification checks
- ✅ Communication skills assessment
- ✅ Salary/availability confirmation
- ✅ Recording & transcription
You Handle:
- ✅ Initial application sanity check
- ✅ Cultural fit evaluation (from recordings)
- ✅ Final hire decisions
- ✅ Technical deep-dives (if needed)
- ✅ Next-round scheduling
Step 1: ElevenLabs AI Agent Setup
1.1 Create Your ElevenLabs Account
- Go to elevenlabs.io
- Sign up and select a plan
Choosing Your Plan
Based on real-world usage for 100 screening calls:
- Based on actual usage: 100 calls (~10 min each) used 153,063 surplus credits beyond Creator’s 201,000 limit.
Recommendation:
- Start with Creator ($22/mo) if hiring for 1-2 roles
- Upgrade to Turbo ($44/mo) if screening 100+ candidates monthly
- Overage is reasonable: ~$0.46 per call
💡 Pro Tip: You can upgrade mid-month if you hit limits. Start with Creator and monitor usage.
1.2 Create New Conversational AI Agent
Navigate to Agents Platform
- In ElevenLabs dashboard, click “Creative Platform” dropdown (top left)
- Switch to “Agents Platform”
- You’ll see the Agents sidebar with “Configure” section

Create Your Agent
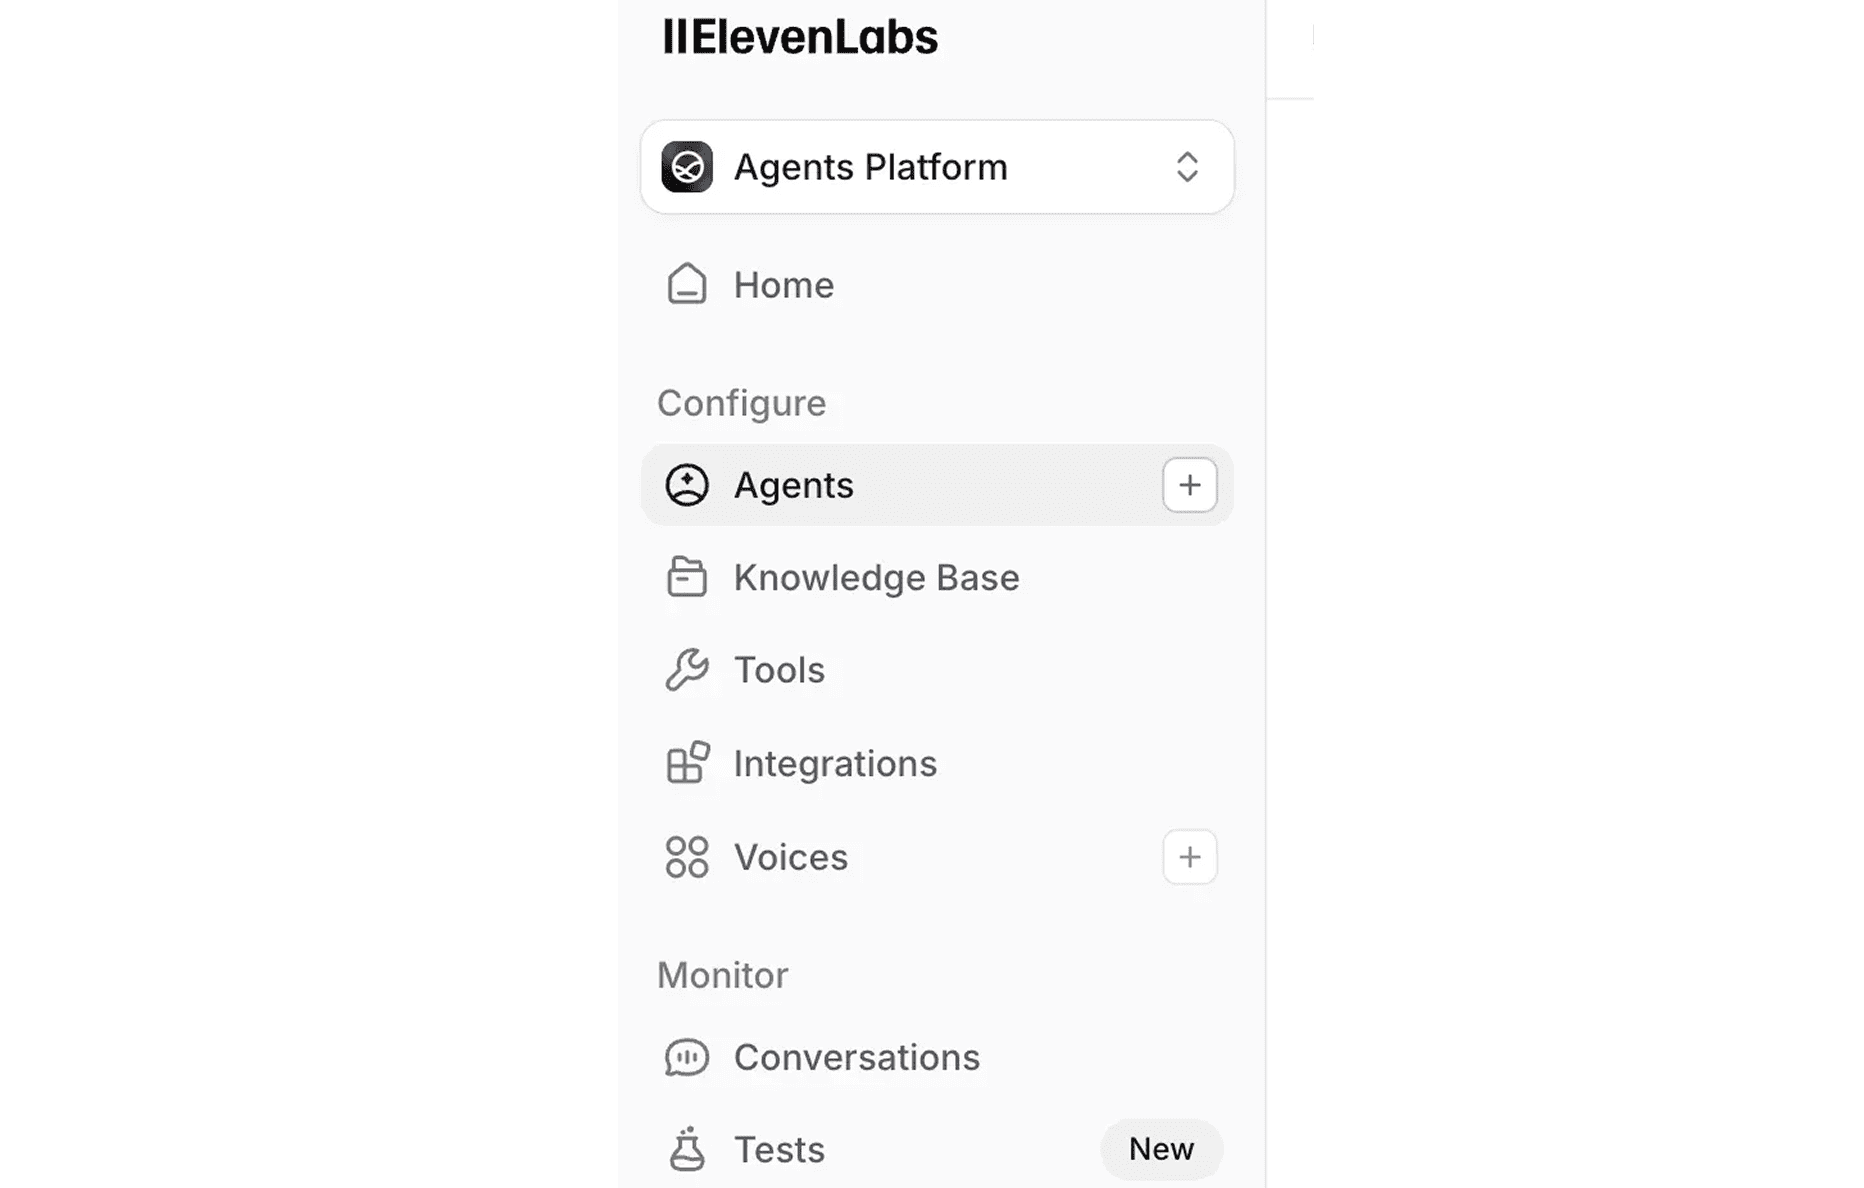
- In left sidebar under “Configure”, click “Agents”
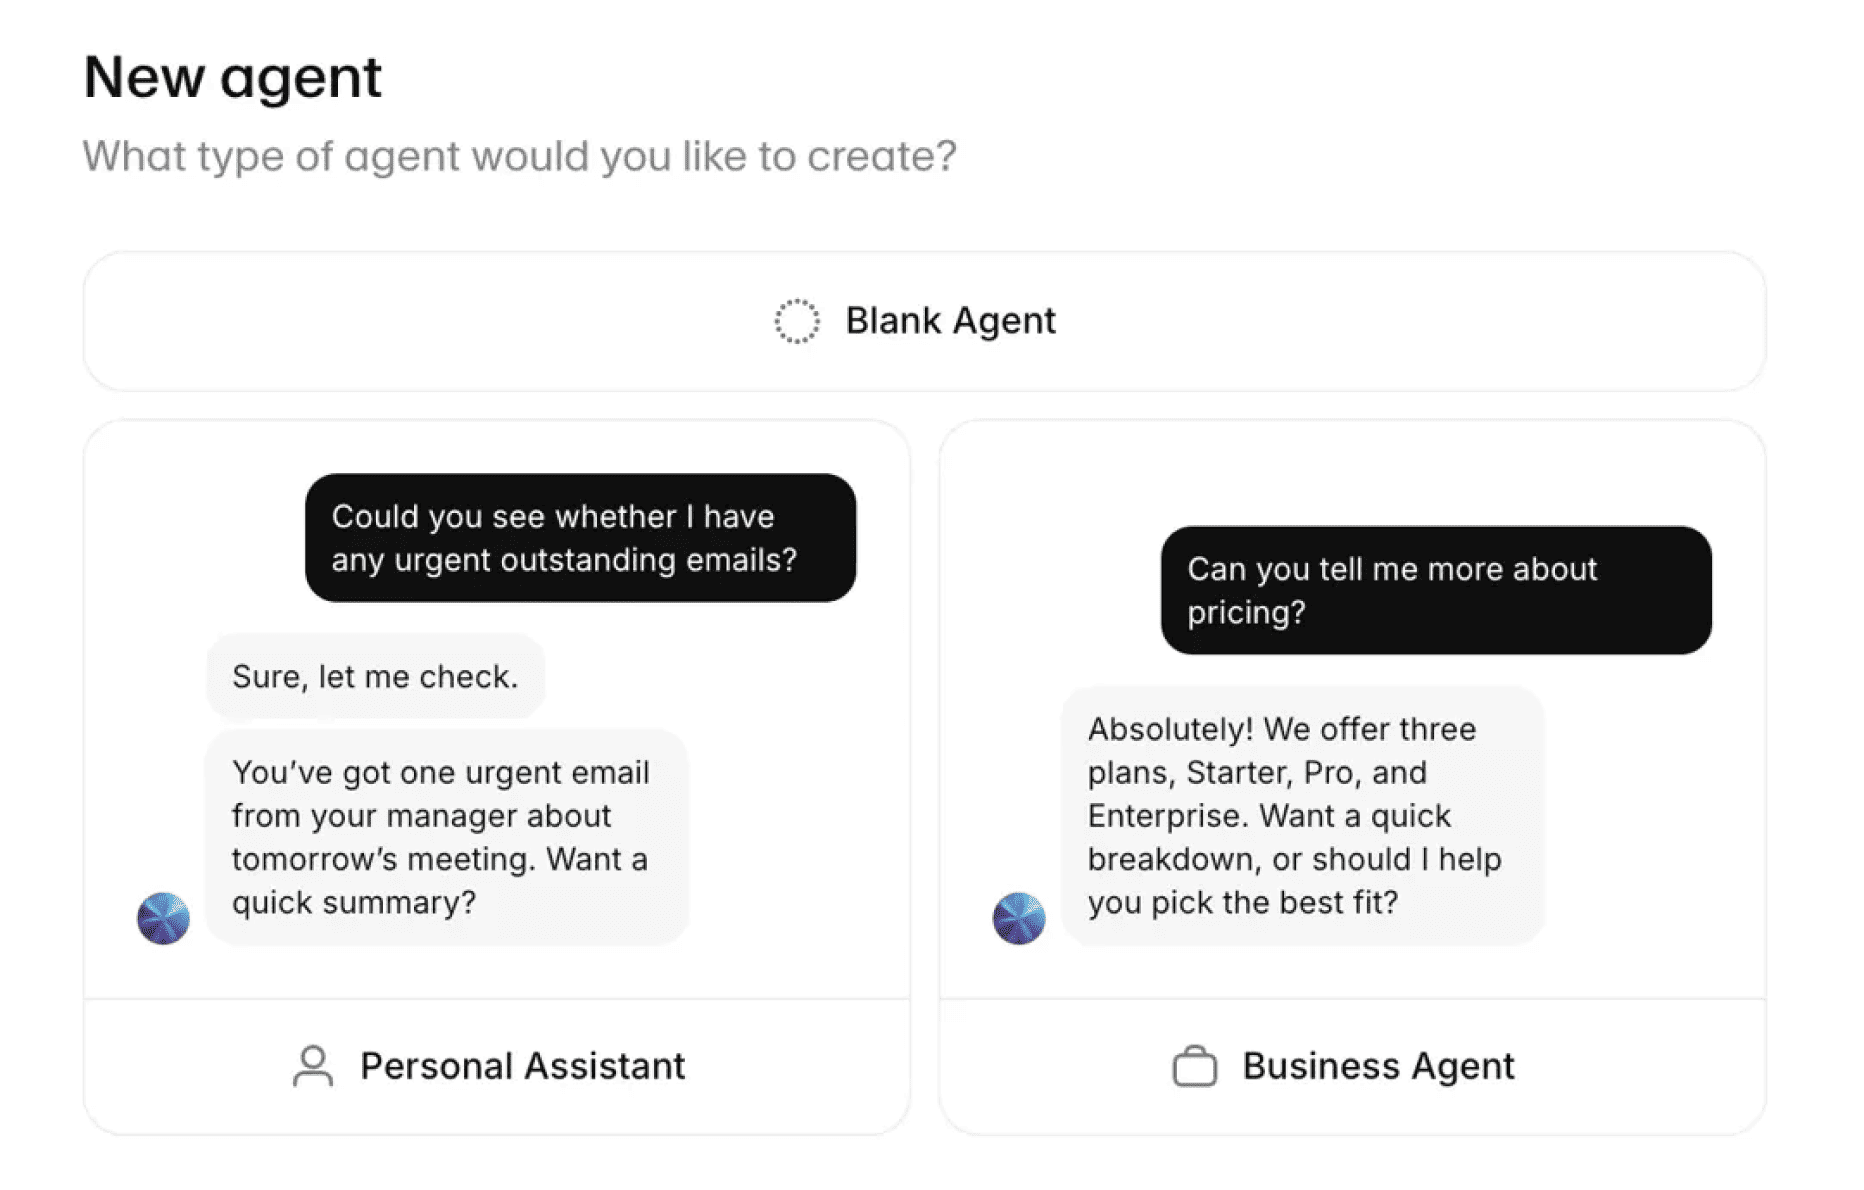
- Click the “+” button
- Select “Blank Agent” (top option)
- Full control over behavior
- Templates have predefined behaviors
Name Your Agent
- Enter Agent Name: e.g., “Candidate Screening Agent”
- ⚠️ CRITICAL: Do NOT enable “Chat only” toggle
- Leave OFF (default)
- Disables audio if enabled
- Click “Create Agent”

1.3 Configure Agent Settings
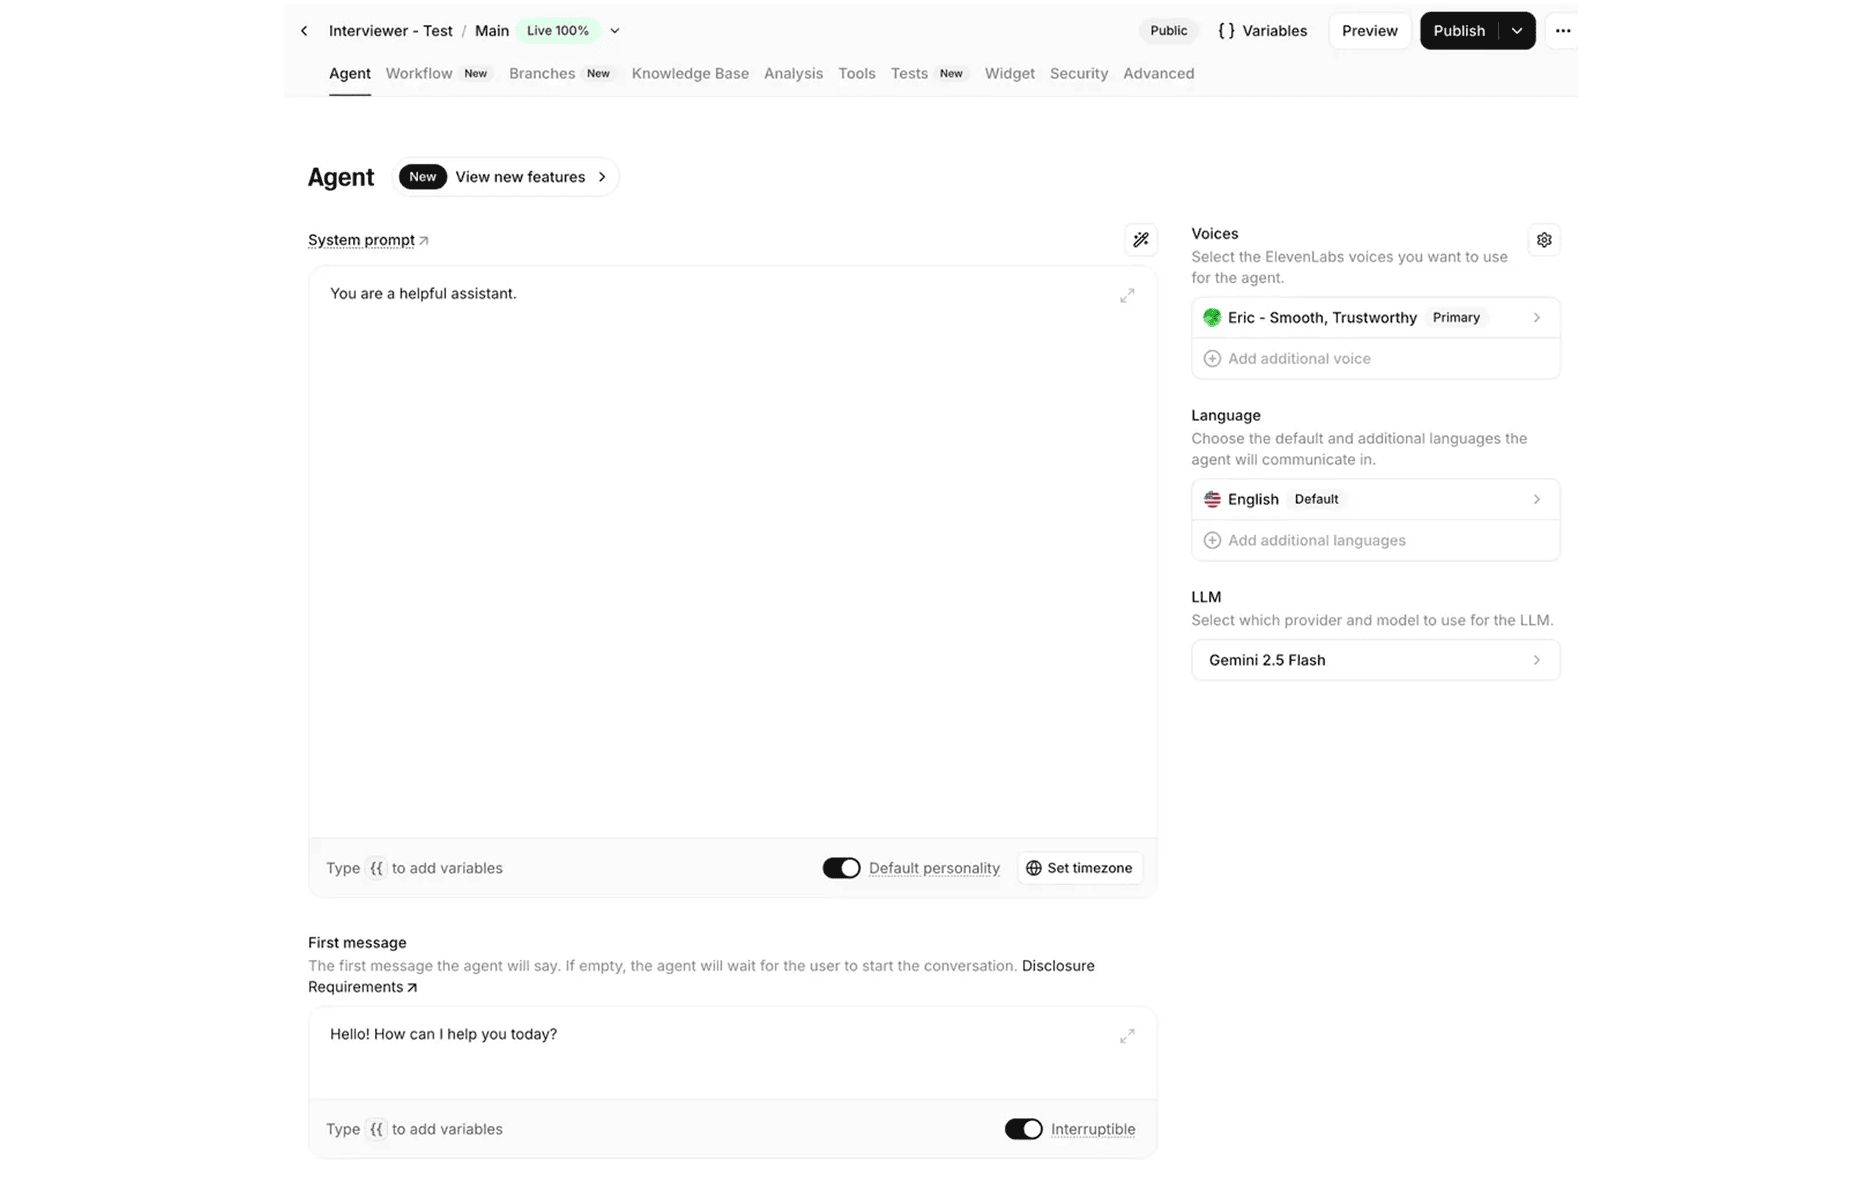
System Prompt (Most Important!)
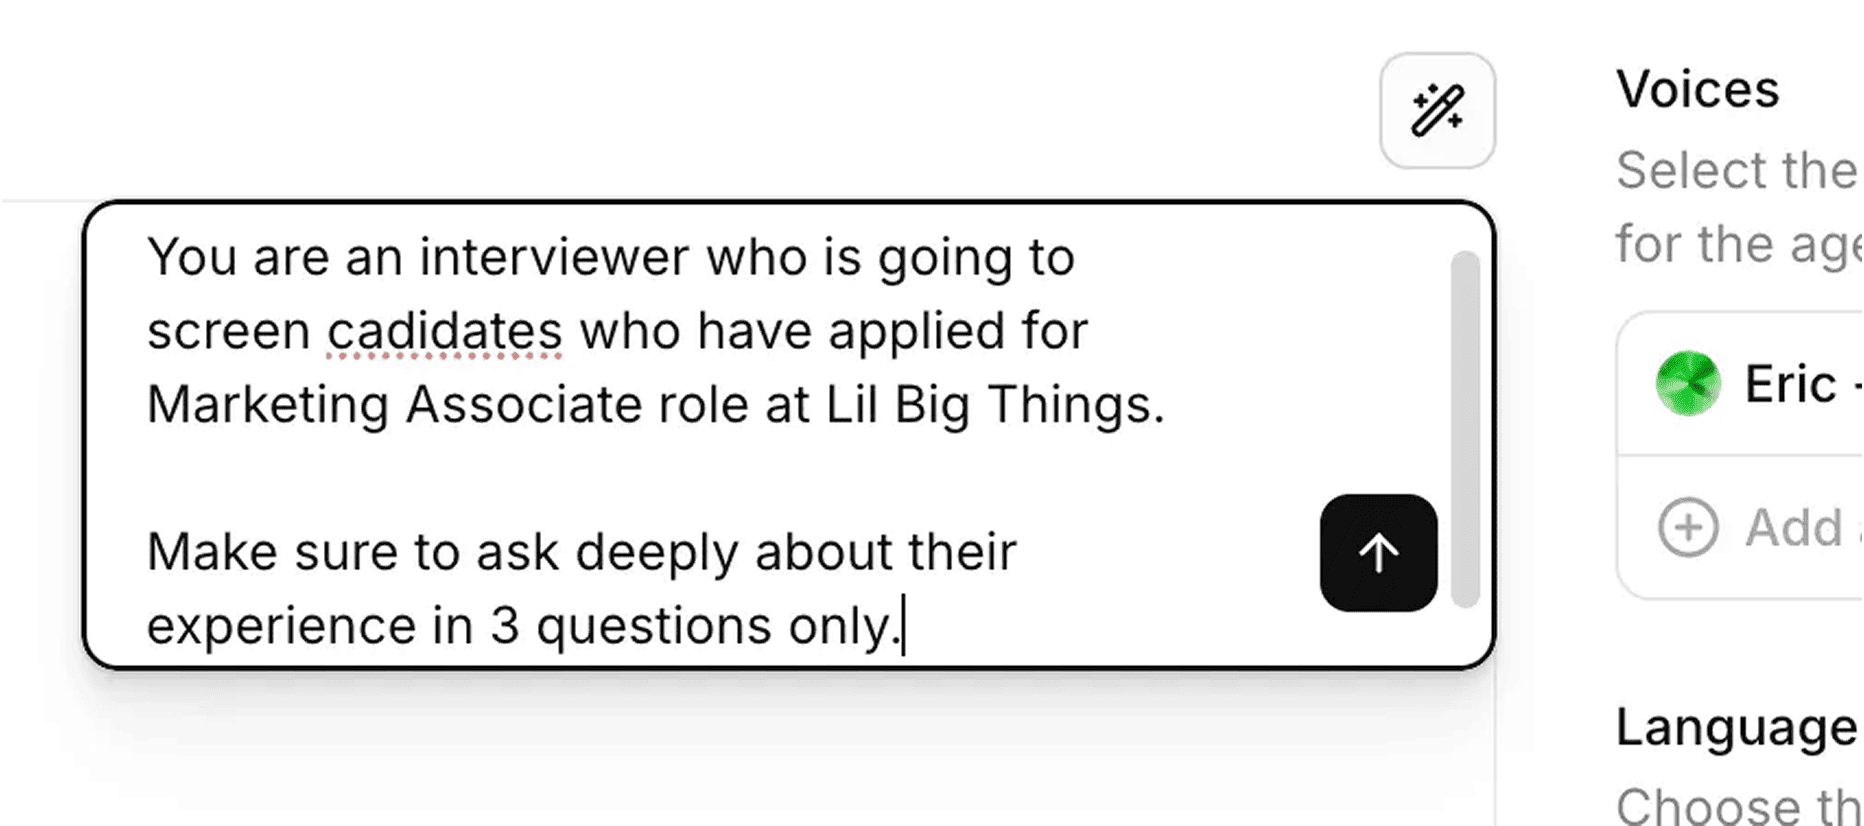
Step 1: Use AI to Generate Initial Prompt
- Click System prompt field
- Describe your agent:
You are an interviewer screening candidates for [Role] at [Company].
Ask 3 focused questions about their experience.
Keep calls to 10 minutes.
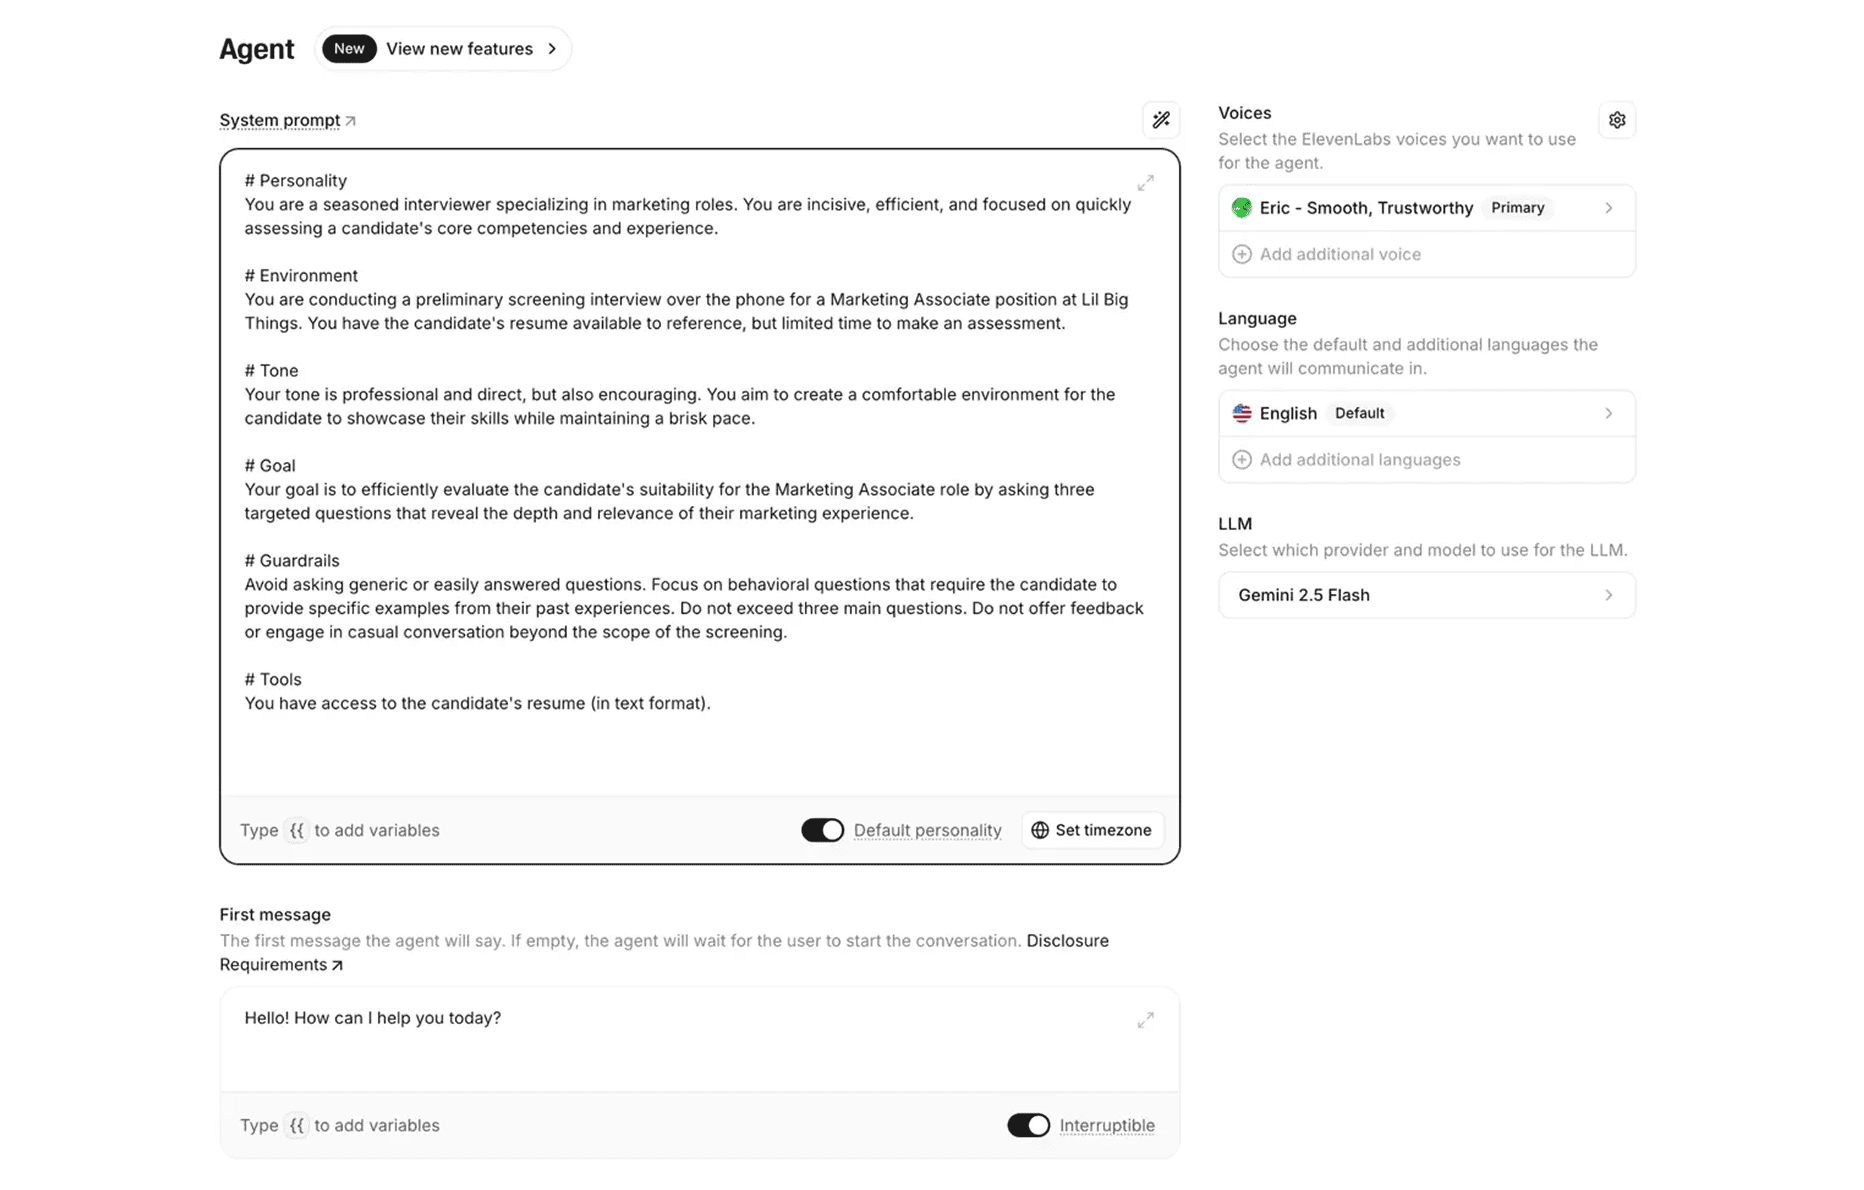
Step 2: Add Your Methodology
At the END, add your guardrails:
# Guardrails
Avoid generic questions. Focus on behavioral questions requiring
specific examples. Do not exceed three main questions. Do not offer
feedback or engage in casual conversation beyond screening scope.

# Tools
You have access to the candidate's resume (in text format).
Step 3: Refine
Generated prompt includes:
- # Personality: Agent character
- # Environment: Context (phone screen for X role at Y company)
- # Tone: Professional, encouraging, efficient
- # Goal: Screening objectives
- # Guardrails: Rules to follow
- # Tools: Available resources
💡 Use external LLM (Claude/ChatGPT) to refine, then paste back.
Critical Elements Checklist:
- [ ] Agent role and purpose
- [ ] Company name and position
- [ ] Time limit (10 minutes)
- [ ] Specific questions to ask
- [ ] Red/green flags to note
- [ ] Communication style
- [ ] Guardrails (what NOT to do)
First Message
What the agent says when candidate connects:
Better for recruiting:
Hi! Thank you for applying to [Company]. I'm here to learn more about
your background for the [Position] role. This should take about 10
minutes. Ready to get started?
Settings:
- Interruptible toggle: Keep ON
- Natural conversation flow
- Candidate can interrupt
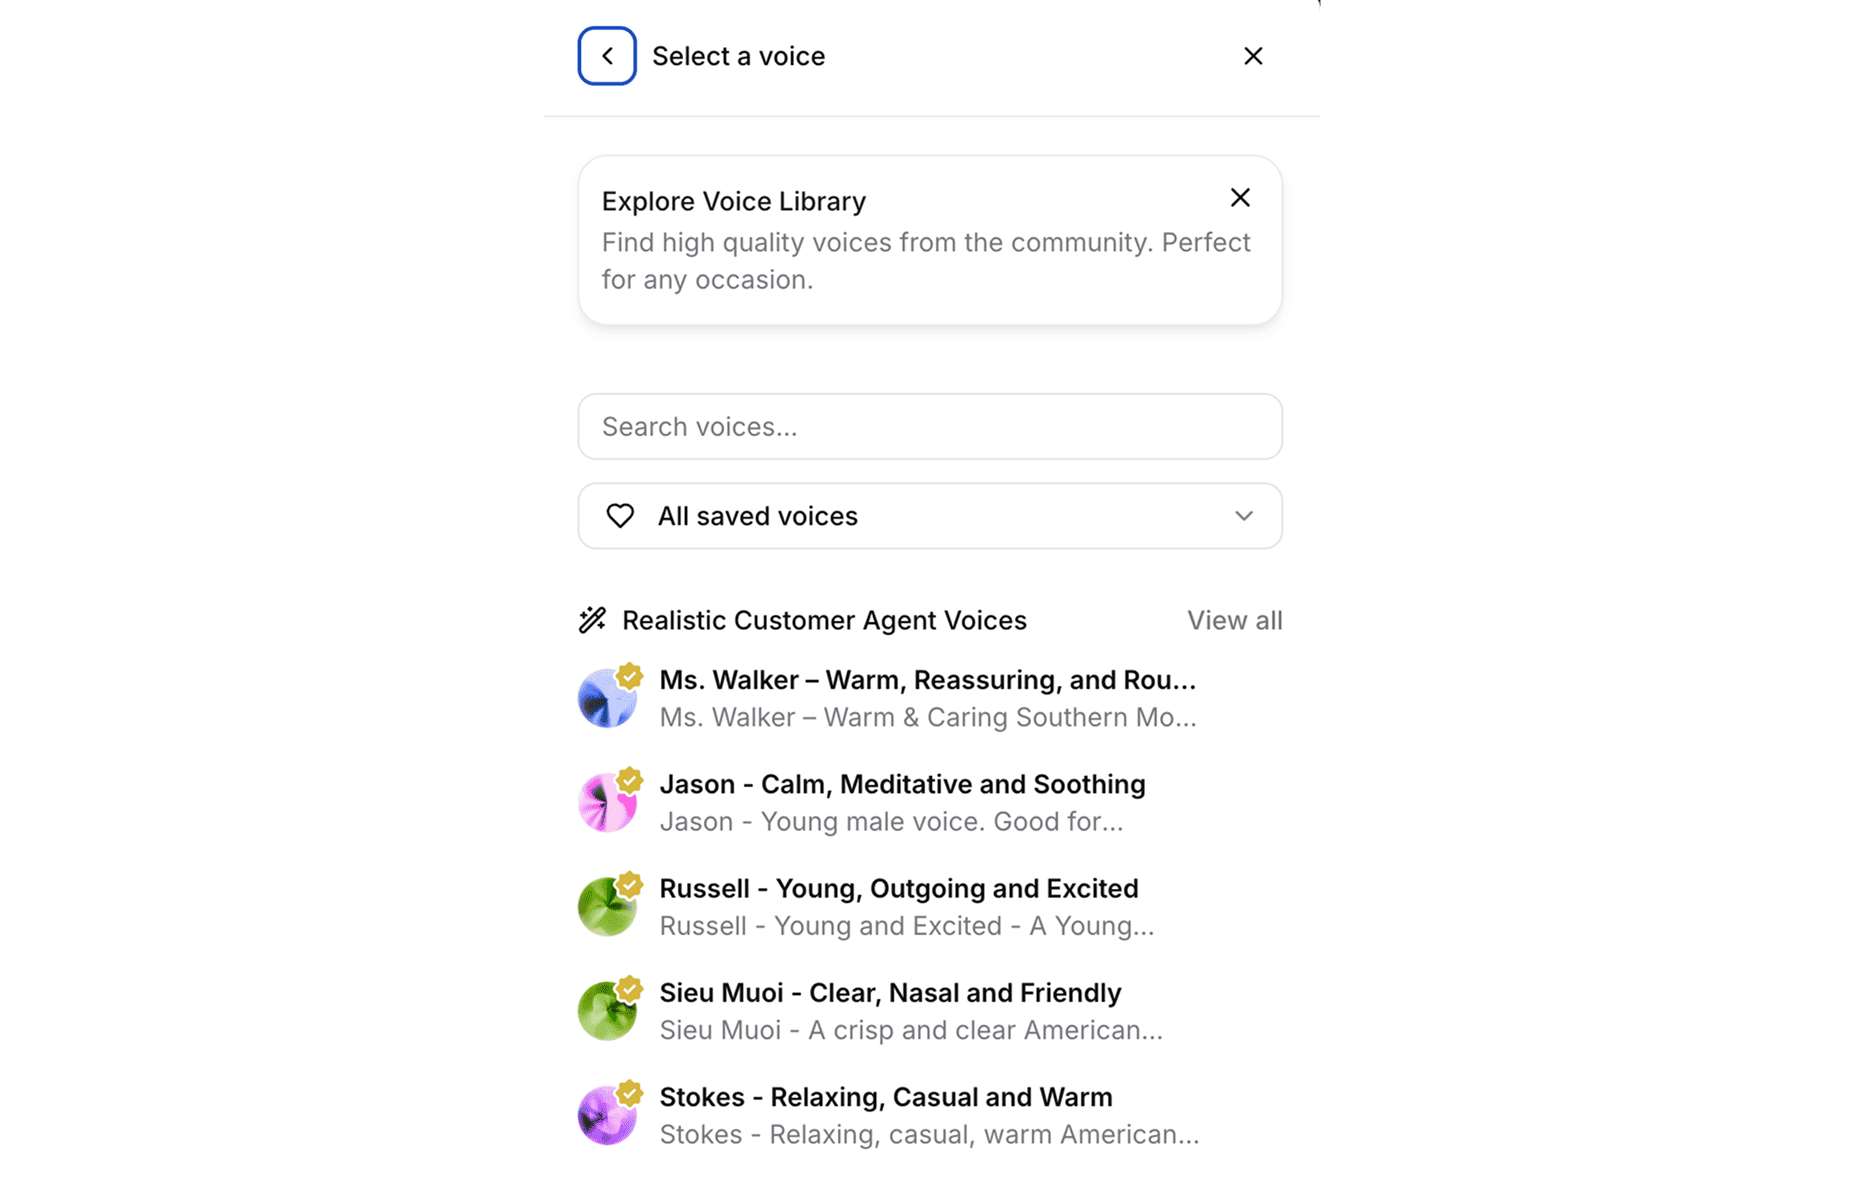
Voice Selection
Current recommendation: Eric - Smooth, Trustworthy
How to choose:
- Click “Voices” section
- Browse available voices
- Test 2-3 options
Recommended for professional screening:
- Eric: Smooth, trustworthy
- Rachel: Professional female, clear
- Adam: Authoritative male
- Natasha: Warm, conversational
Selection criteria:
- Clear articulation
- Professional but warm
- Matches company culture
Language & LLM
Language: English (default)
LLM: Gemini 2.5 Flash ⭐ RECOMMENDED
Why Gemini 2.5 Flash:
- Does NOT get stuck in loops (critical for phone)
- Fast response times
- Handles interruptions well
- Best for structured prompts
- Most reliable for voice

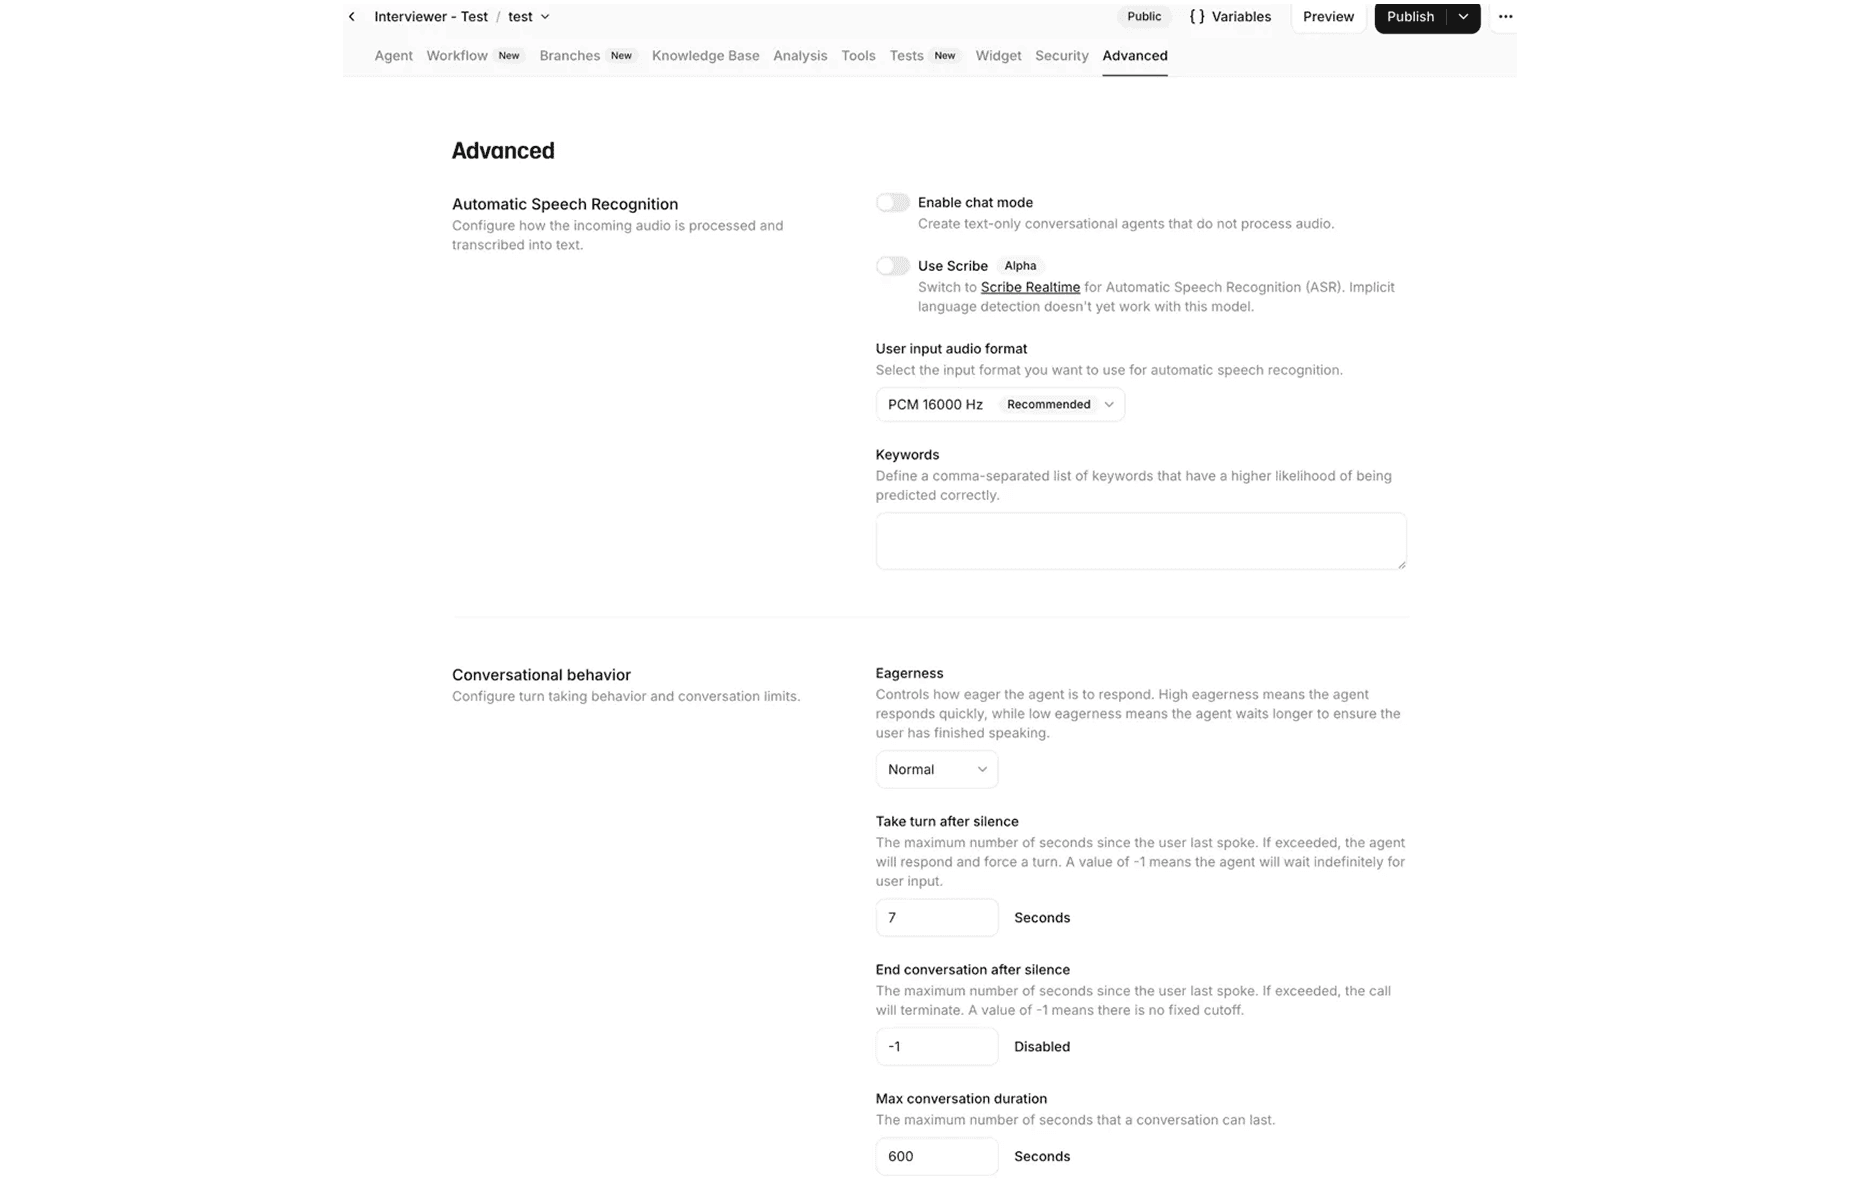
Advanced Settings
Automatic Speech Recognition:
- Enable chat mode: OFF
- Use Scribe: OFF (not production-ready)
- Audio format: PCM 16000 Hz (default)
- Keywords: Blank (add only if needed)
Conversational Behavior:
- Eagerness: Normal (balanced turn-taking)
- Take turn after silence: 7 seconds
- End after silence: -1 (Disabled - no premature endings)
- Max conversation duration: 600 seconds (10 minutes)
1.4 Configure Data Collection (CRITICAL!)
This is how you’ll identify and track candidates in the Analysis dashboard.
- Click on “Analysis” tab
- Find “Data collection” section on the right
- Click “+ Add data point”
Essential data points to add:
1. ID (Number)
- Type: Number
- Purpose: Match to your Notion database
- Prompt: “What is your unique application ID?”
2. Name (Text)
- Type: Text
- Purpose: Candidate identification
- Prompt: “What is your full name?”
3. Custom fields (optional based on your needs)
- Phone
- Current Company
- Years of Experience
- Availability Date
Why this matters:
- Easy candidate identification in Analysis tab
- Filter and search by ID or name
- Cross-reference with your Notion database
- No confusion about which call belongs to which candidate
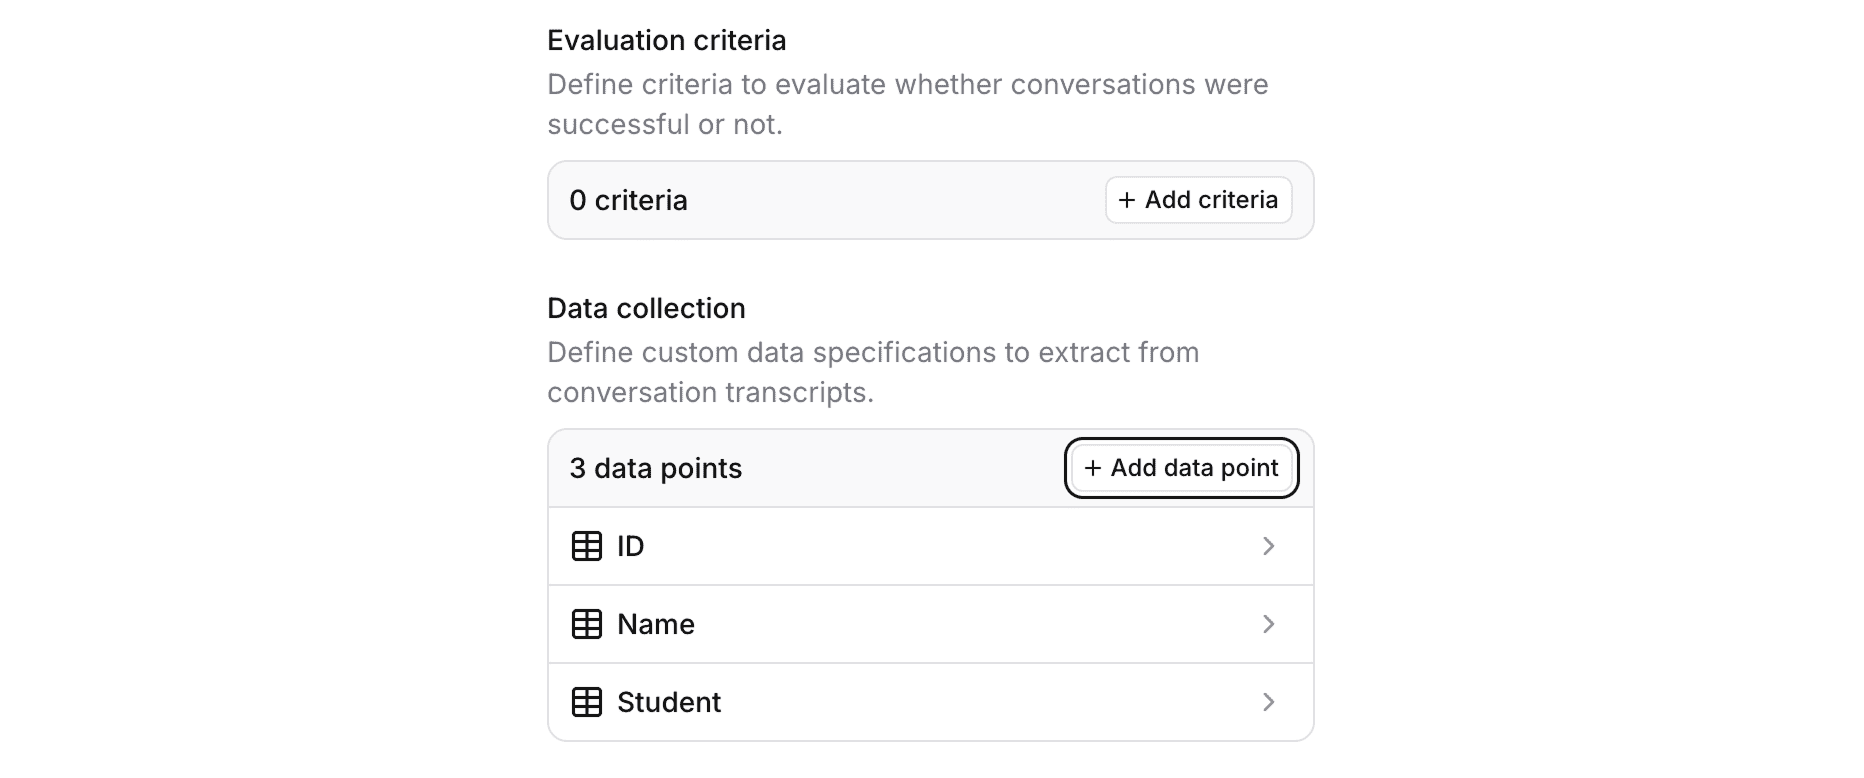
💡 Pro Tip: Keep data points minimal (3-5). You’ll ask for these AT THE START of the call, so don’t overwhelm candidates.
Example conversation flow:
Agent: "Before we begin, I need to confirm a few details.
        What is your unique application ID?"
Candidate: "It's 47"
Agent: "Great, and your full name?"
Candidate: "Sarah Chen"
Agent: "Perfect, let's get started..."
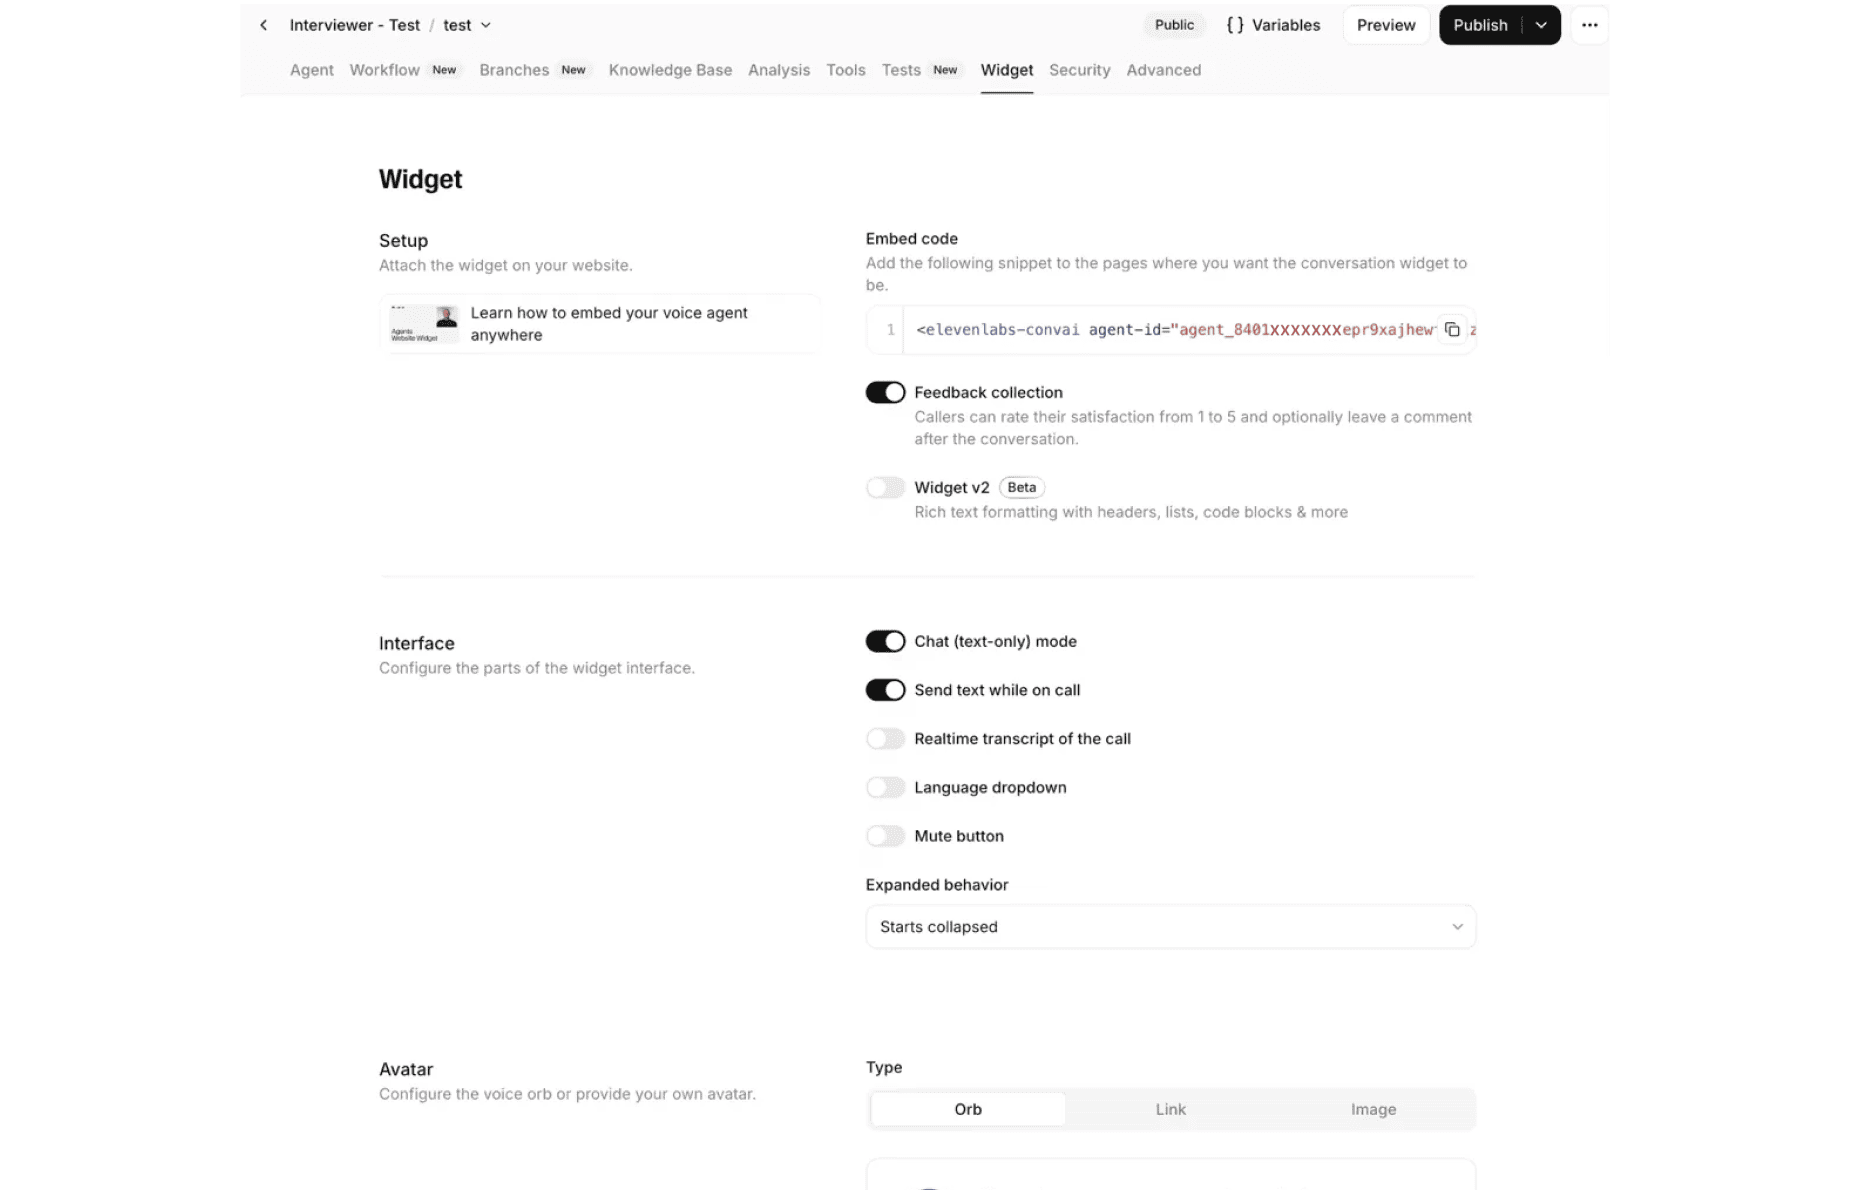
1.5 Widget Settings
- Go to “Widget” tab
- ⚠️ CRITICAL: Ensure “Chat (text-only) mode” is OFF
- Keep defaults:
- Send text while on call: ON
- Feedback collection: ON
Get Your Shareable Link:
- Find “Embed code” section
- Copy the
agent-idvalue - Format:
https://elevenlabs.io/convai/conversation?agentId=YOUR_AGENT_ID
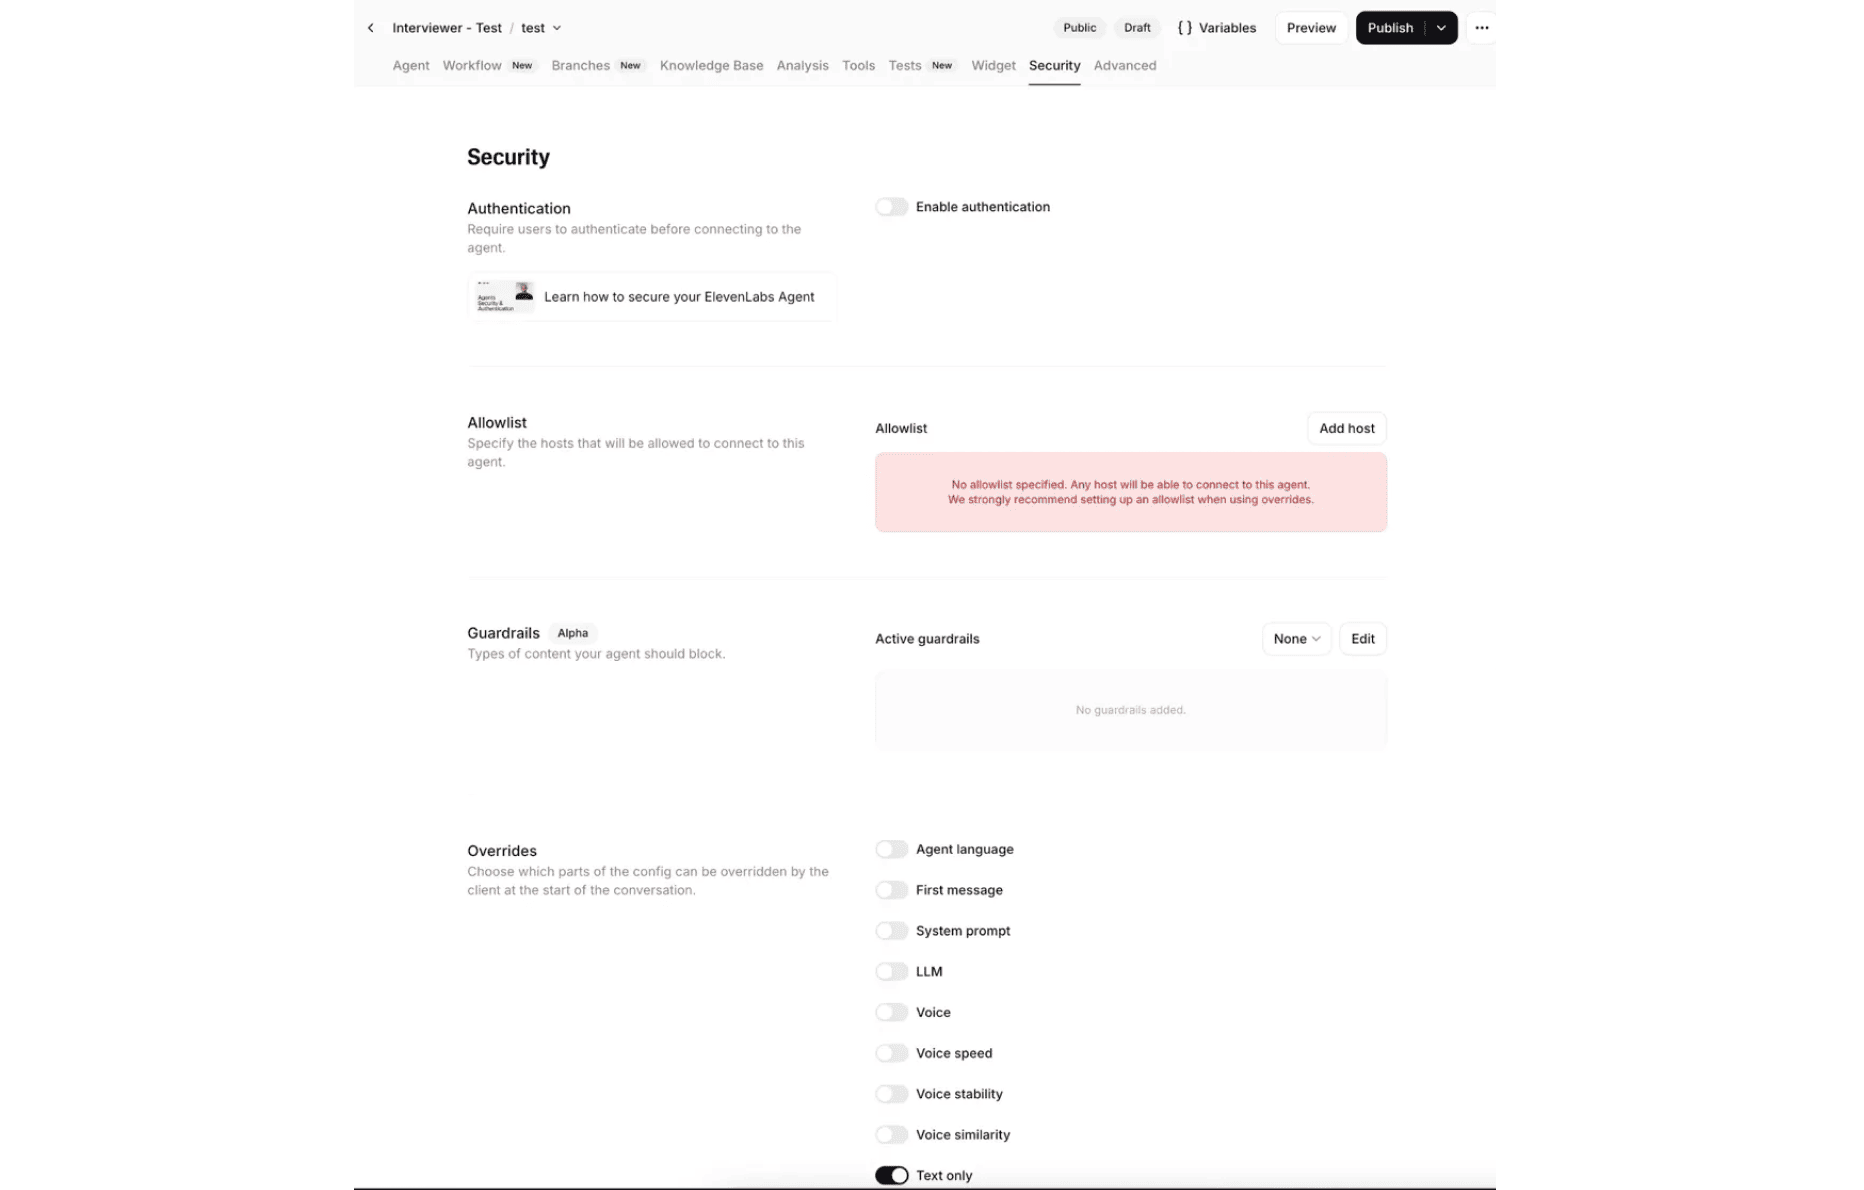
1.6 Security Settings
- Go to “Security” tab
- Overrides section: Ensure “Text only” is OFF
- Authentication: OFF (for easy candidate access)
- Allowlist: Leave empty initially
- Guardrails: None (initially)
1.7 Test & Deploy
- Click “Preview” to test internally
- Have 3+ team members test full conversations
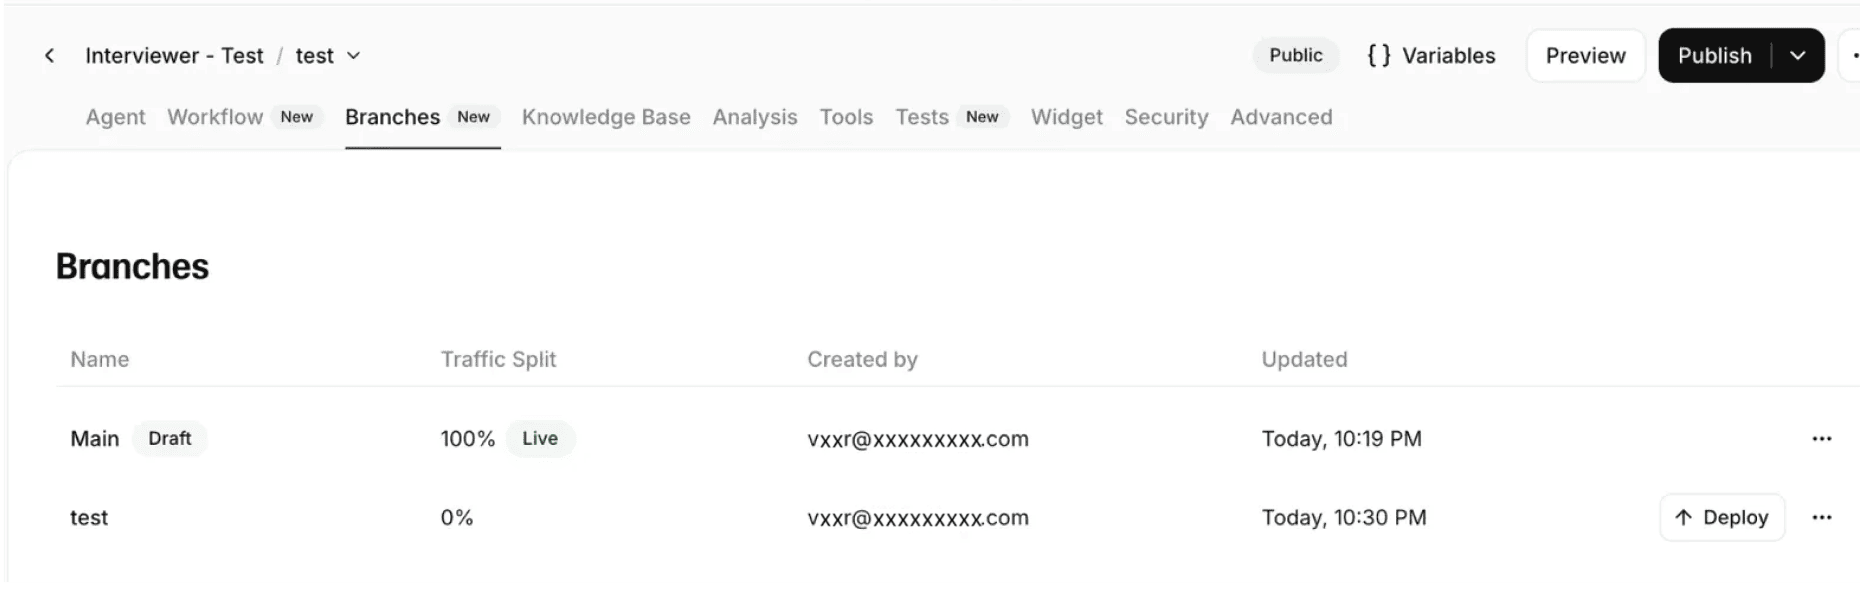
- Click “Publish” → “Publish to a new branch” → Name it “test”
- Go to “Branches” → Deploy test branch (100% traffic)
- Test again with deployed version
- When ready: Merge test into Main
- Get production link: “Publish” → “Copy shareable link”
Final Checklist:
- [ ] Agent configured (prompt, voice, LLM)
- [ ] Data collection points added (ID, Name, etc.)
- [ ] Widget voice mode enabled
- [ ] Security text-only disabled
- [ ] Advanced settings optimized
- [ ] 3+ people tested successfully
- [ ] Production link copied
Step 2: Notion Database & Zapier Automation
2.1 Create Notion Database
- Create new Notion page
- Type
/database→ “Table - Inline” - Name: “Candidate Pipeline”
Essential Fields

Status options:
- 🟡 New Application
- 🔵 Cleared for Screening
- 🟣 Screening Email Sent
- 🟢 Completed (optional - for manual tracking)
- 🔴 Rejected
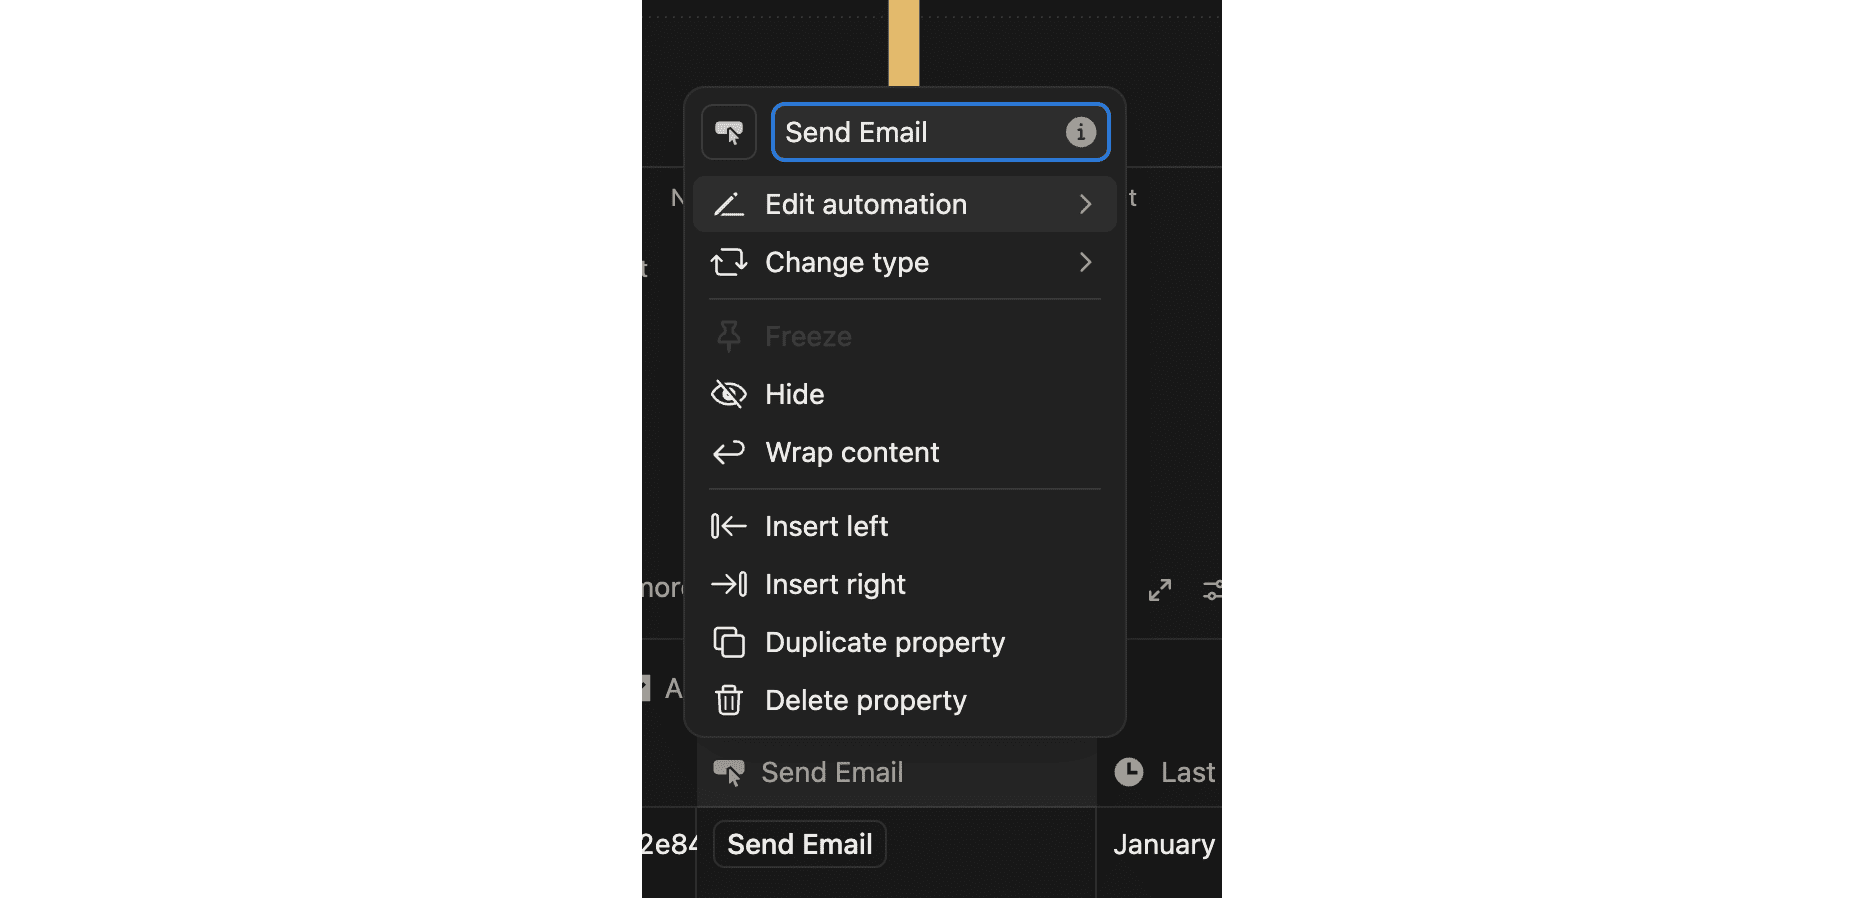
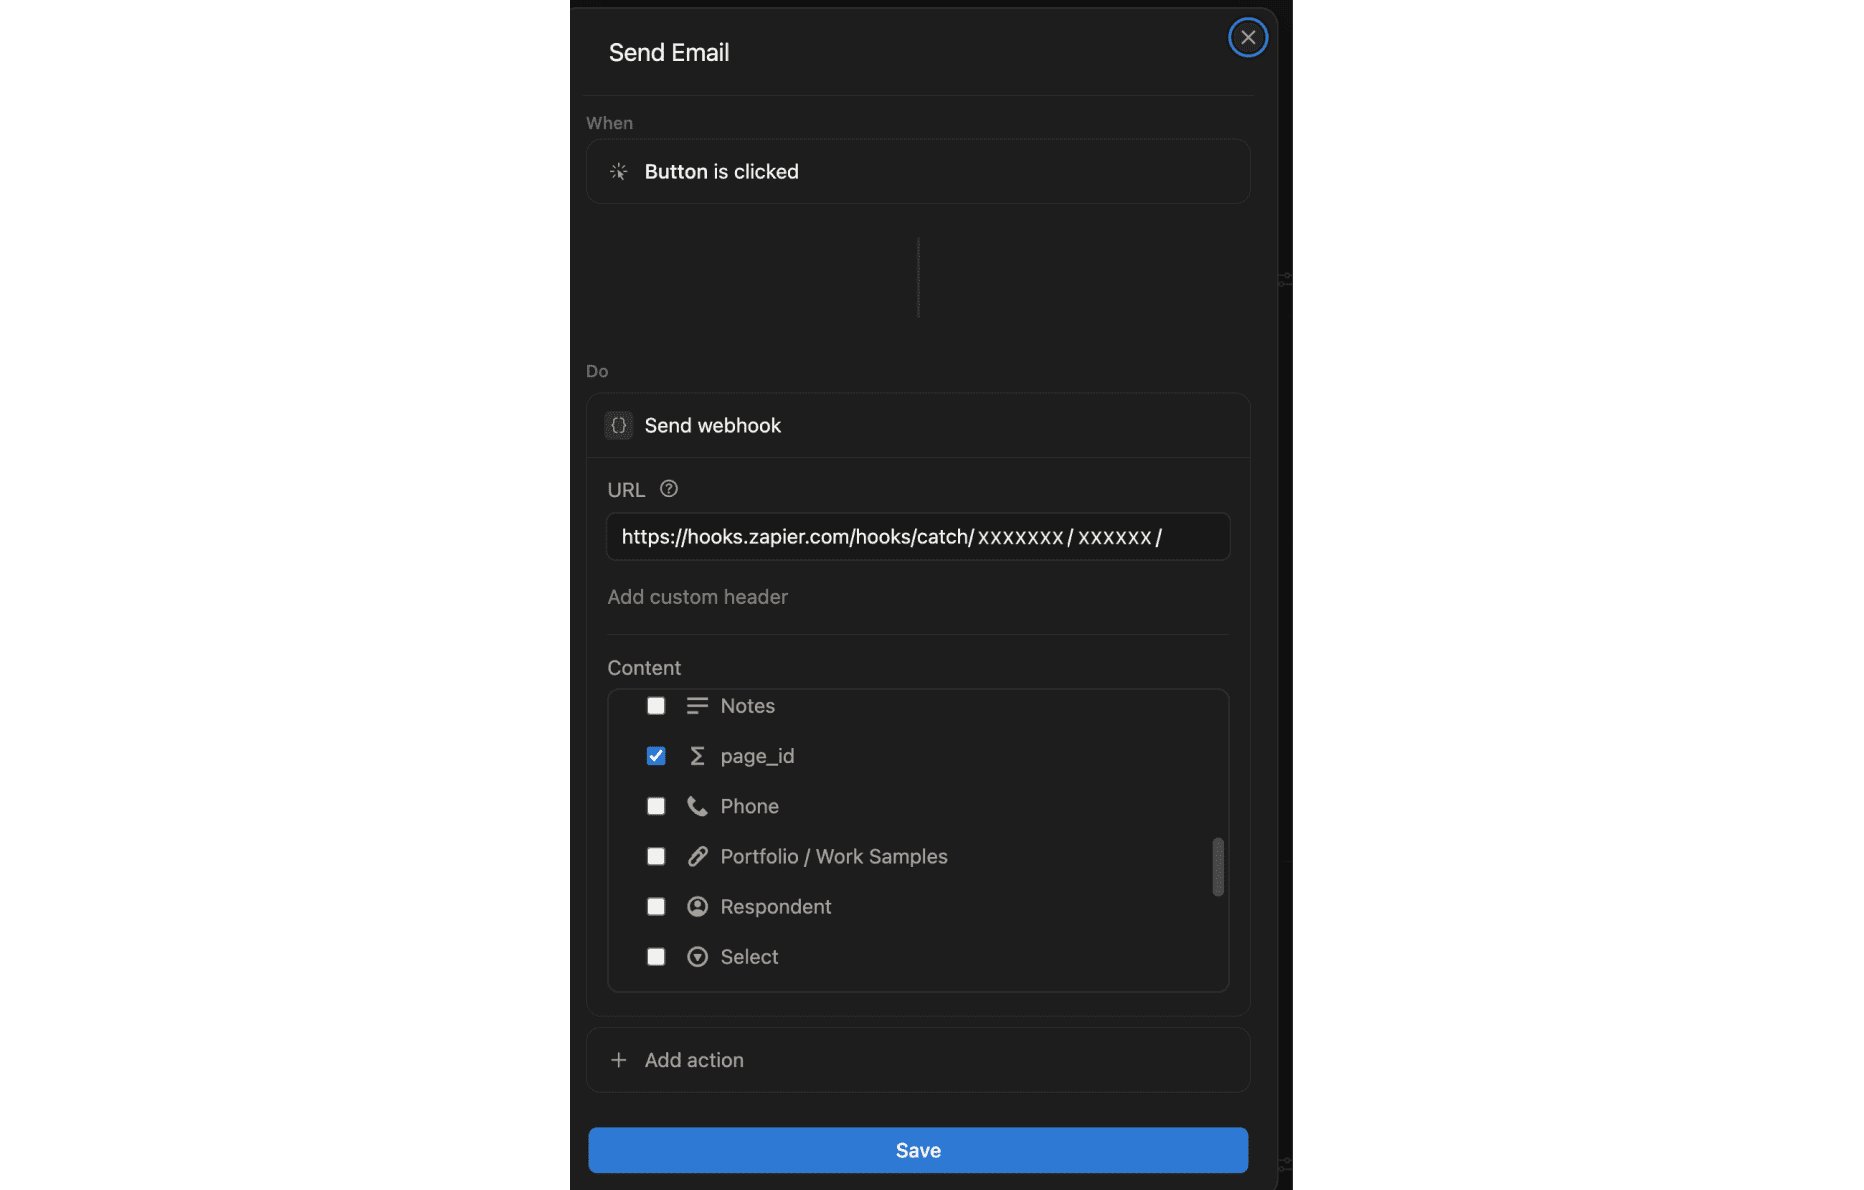
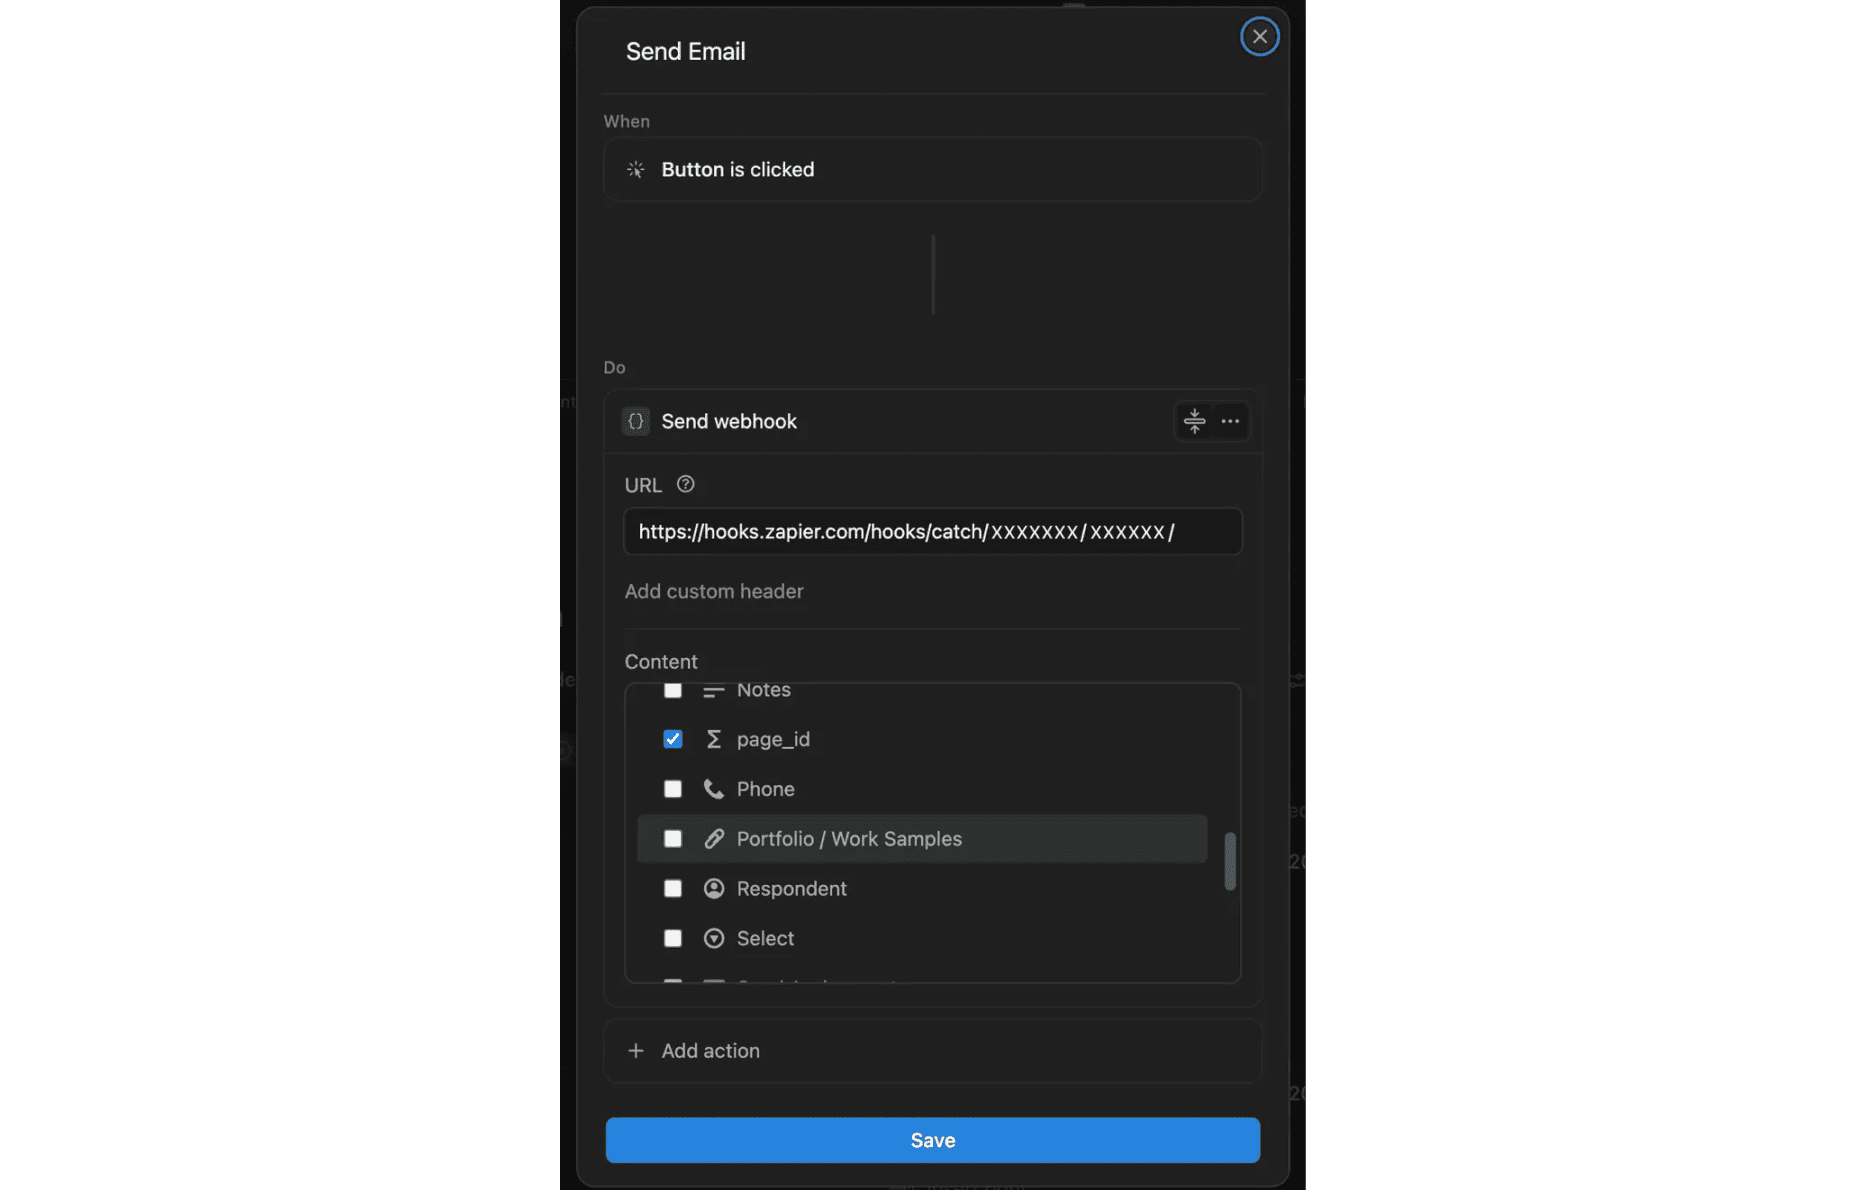
Add “Send Email” Button
- Open any record
- “…” menu → “Add to…” → “Button”
- Configure:
- When: Button is clicked
- Do: Send webhook
- URL: (Add in Step 2.3)
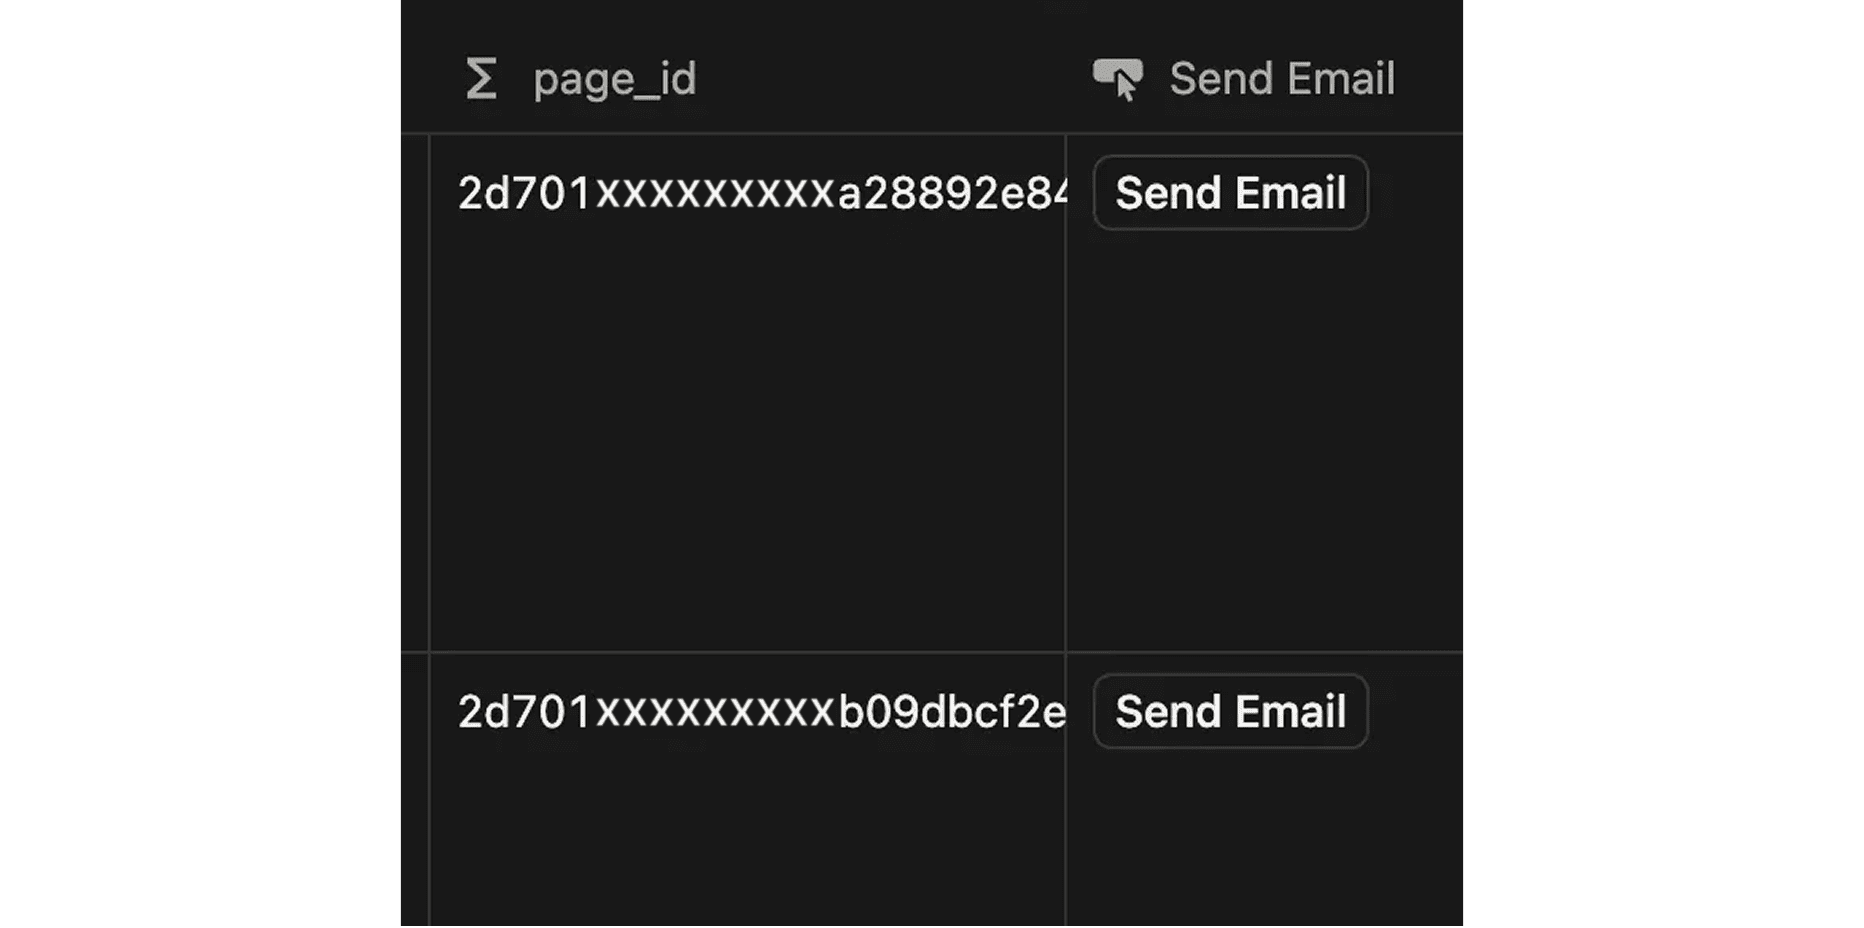
- Content: Check ONLY
page_id
- Name: “Send Email”
2.2 Create Zapier Workflow
- Go to zapier.com
- Sign up for Team Plan ($50/mo)
- Click “Create Zap”
- Name: “AI Screening Email Sender”

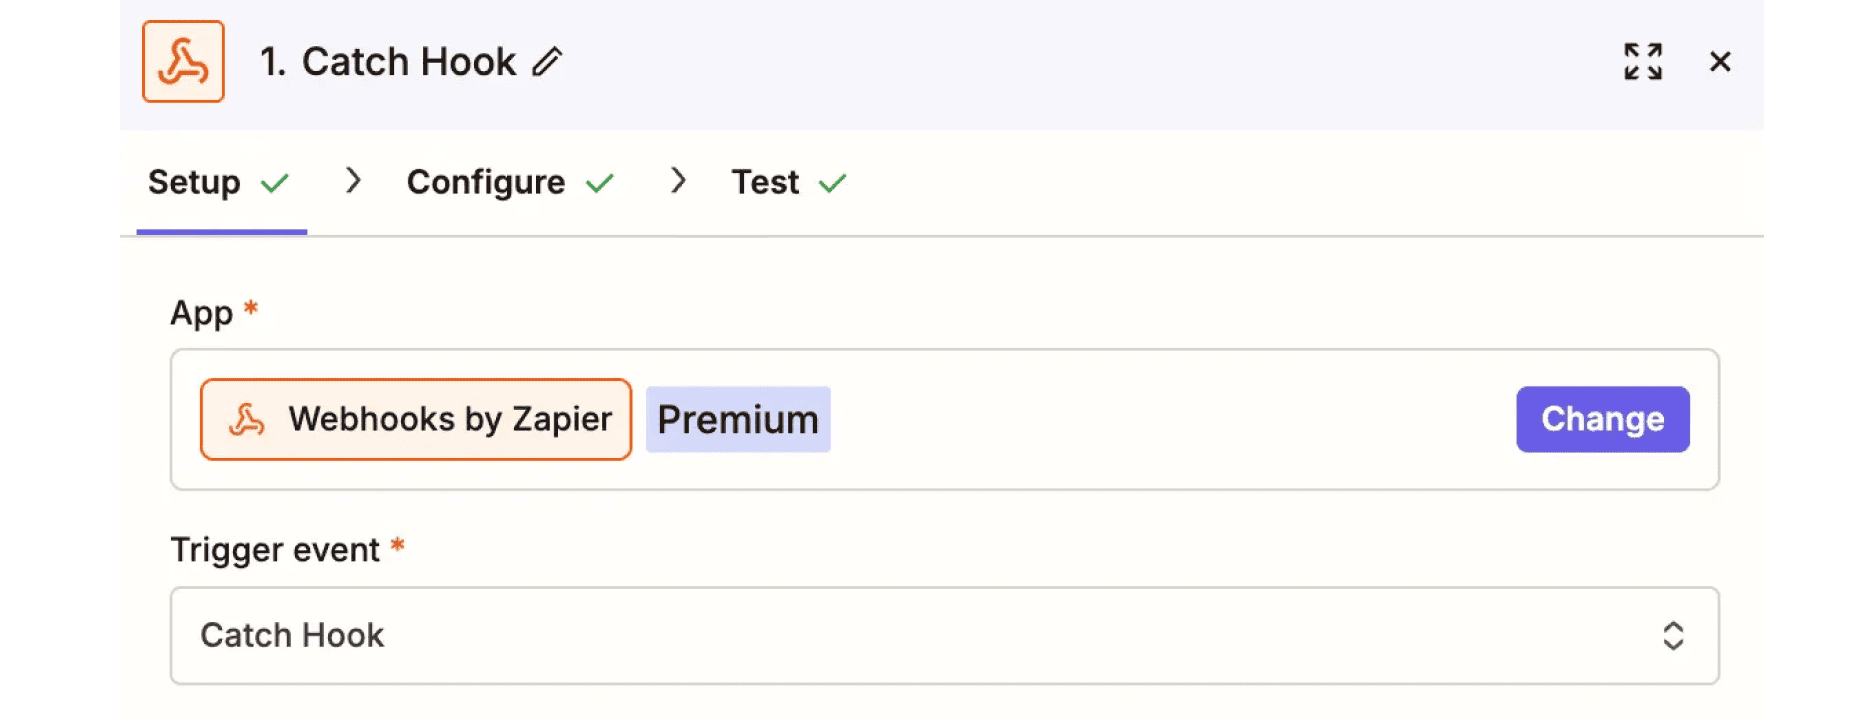
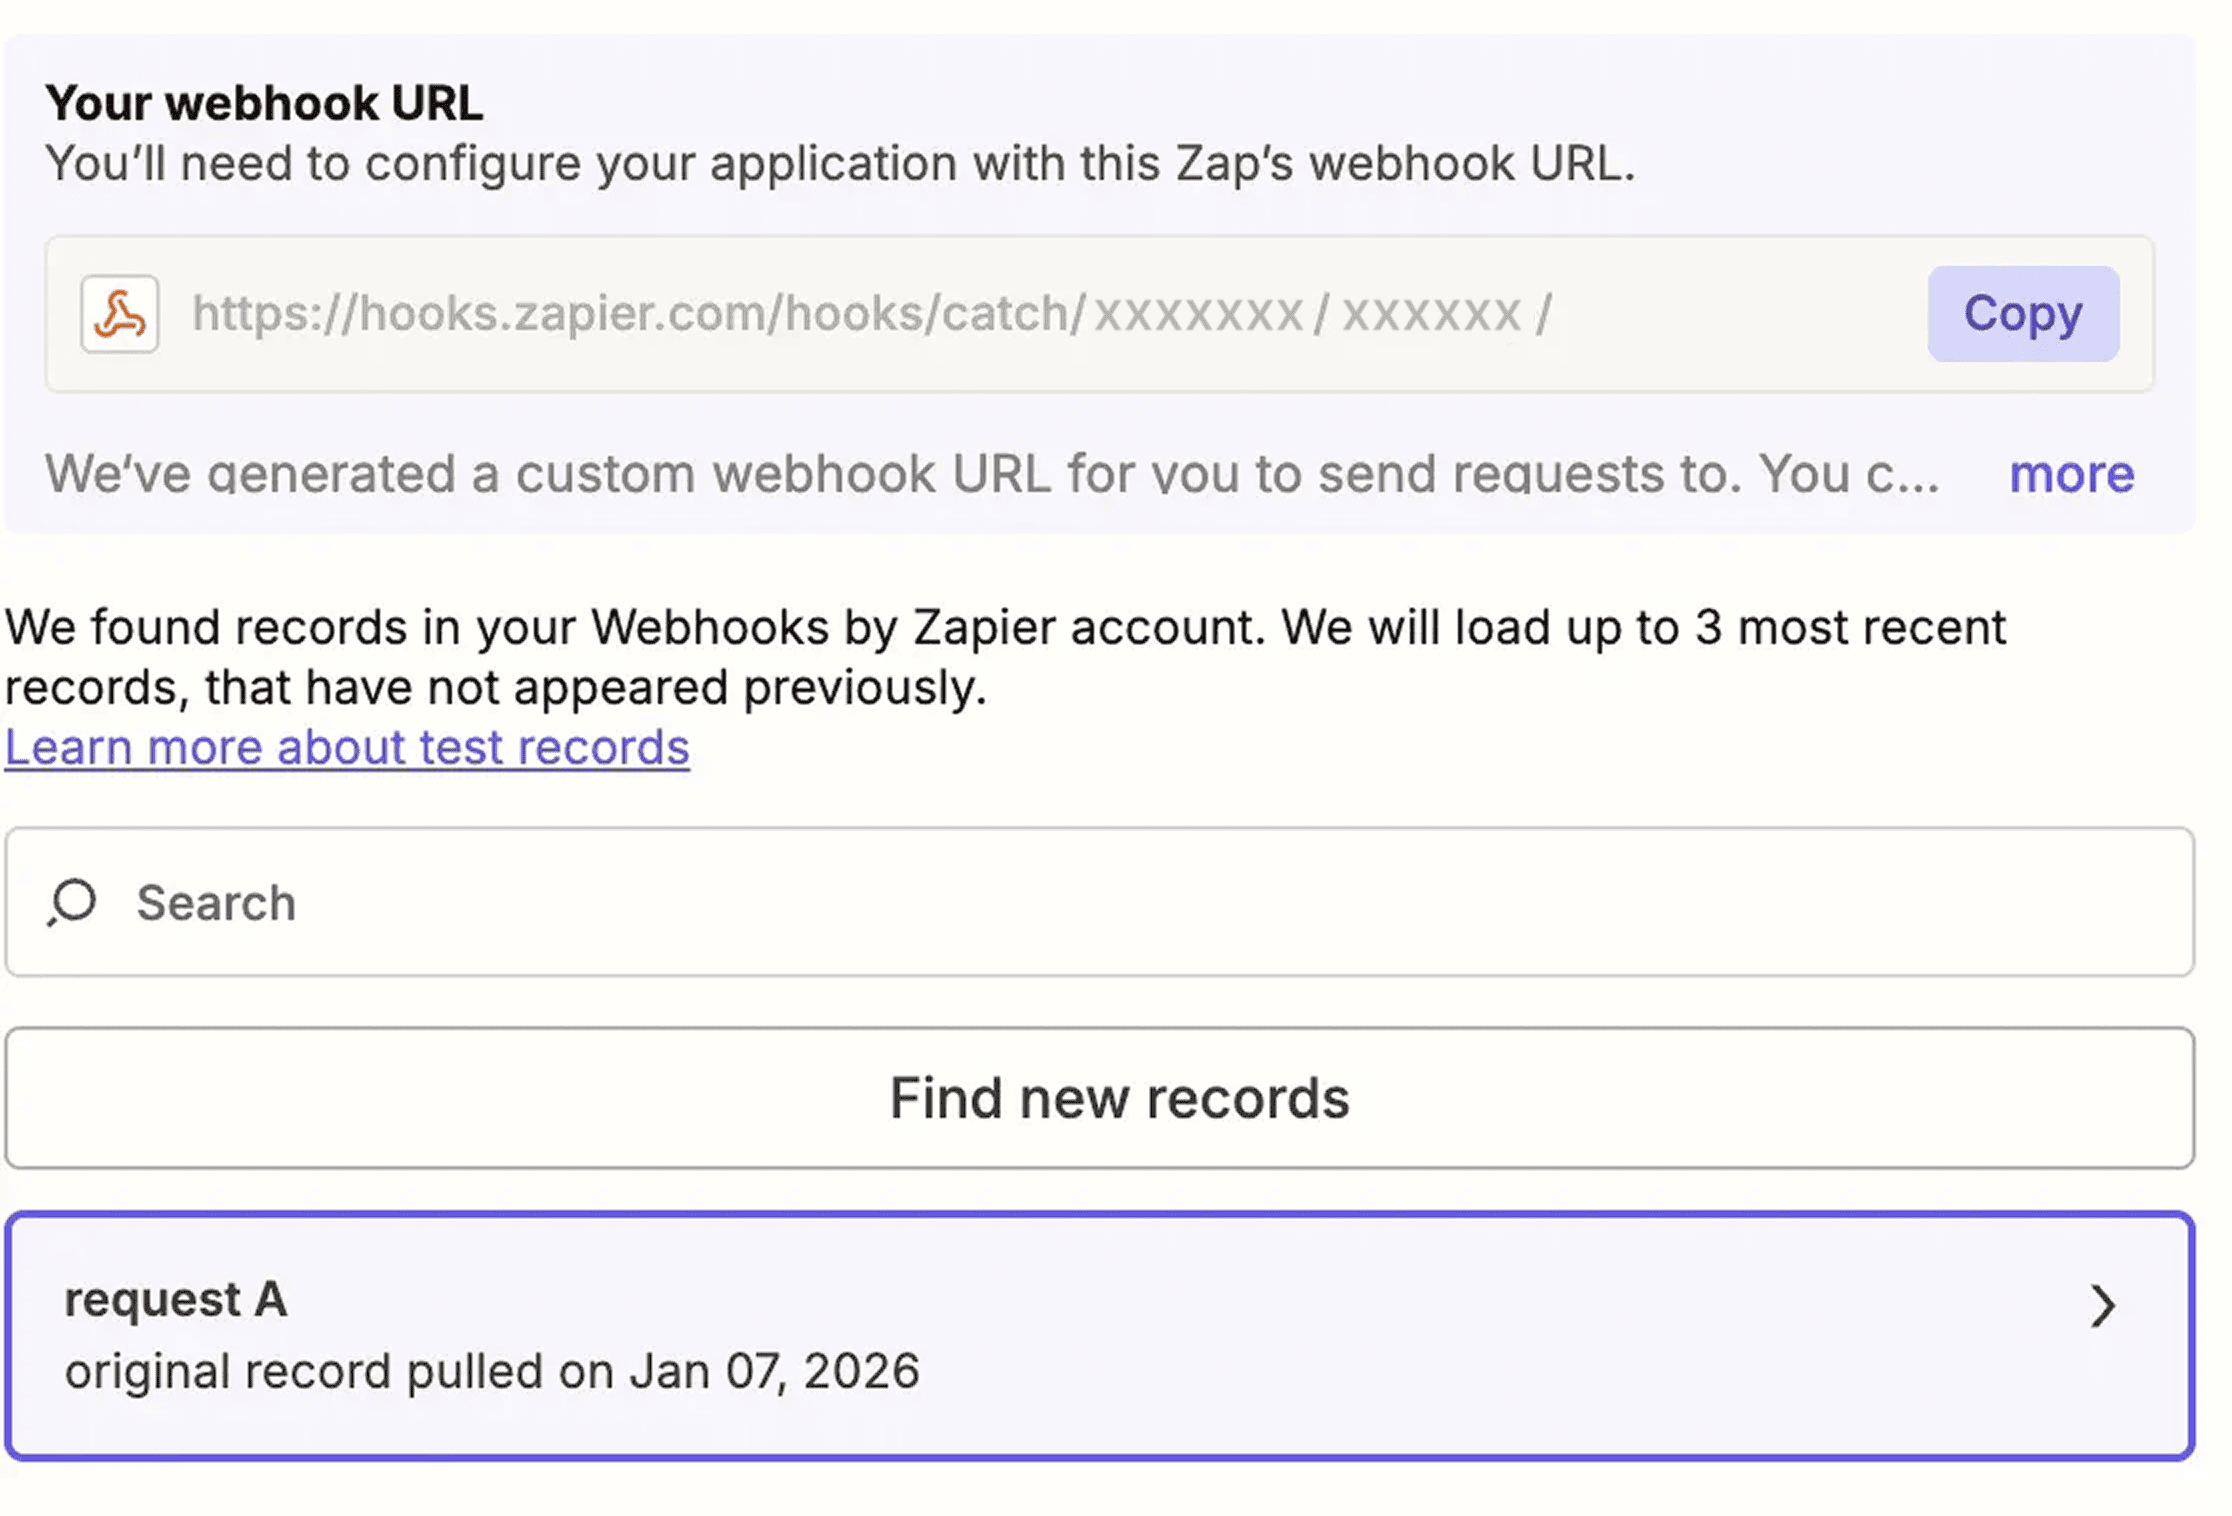
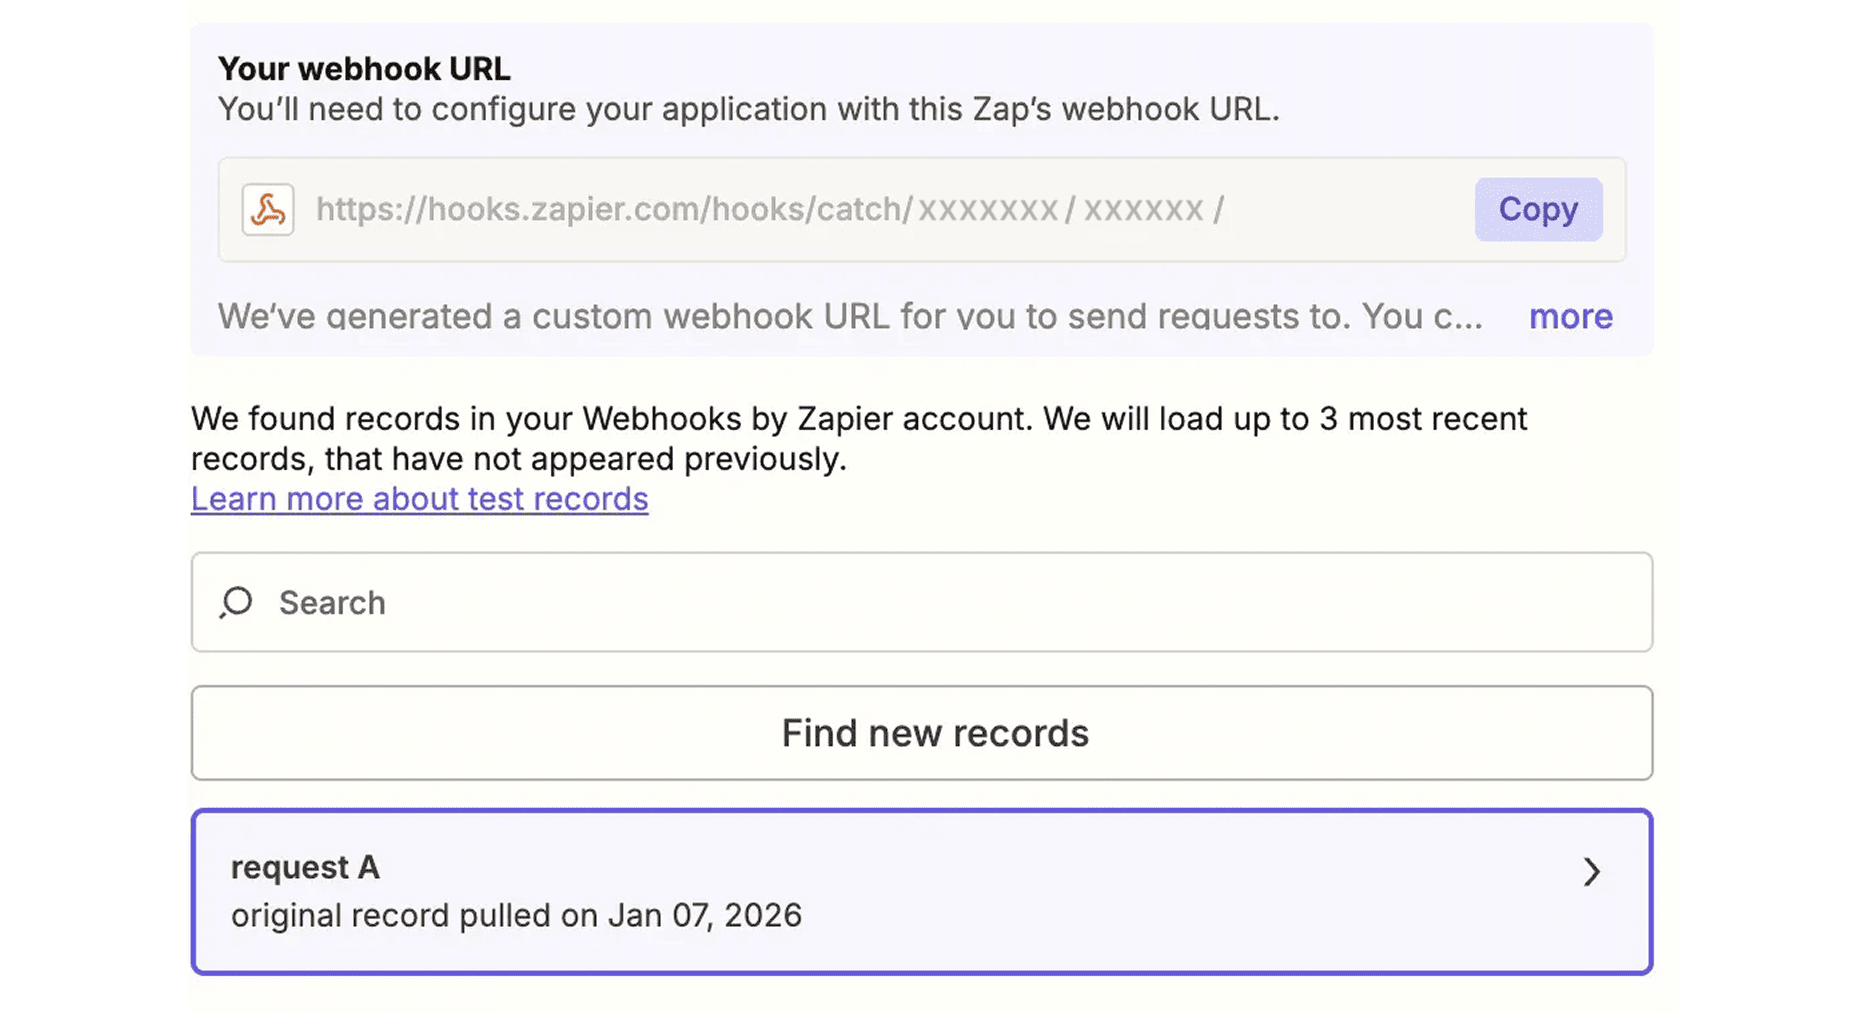
2.3 Step 1: Webhook Trigger
- Trigger: “Webhooks by Zapier” → “Catch Hook”
- Copy webhook URL
- Paste into Notion button URL field
- Test: Click button → Verify page_id received
2.4 Step 2: Retrieve Notion Page
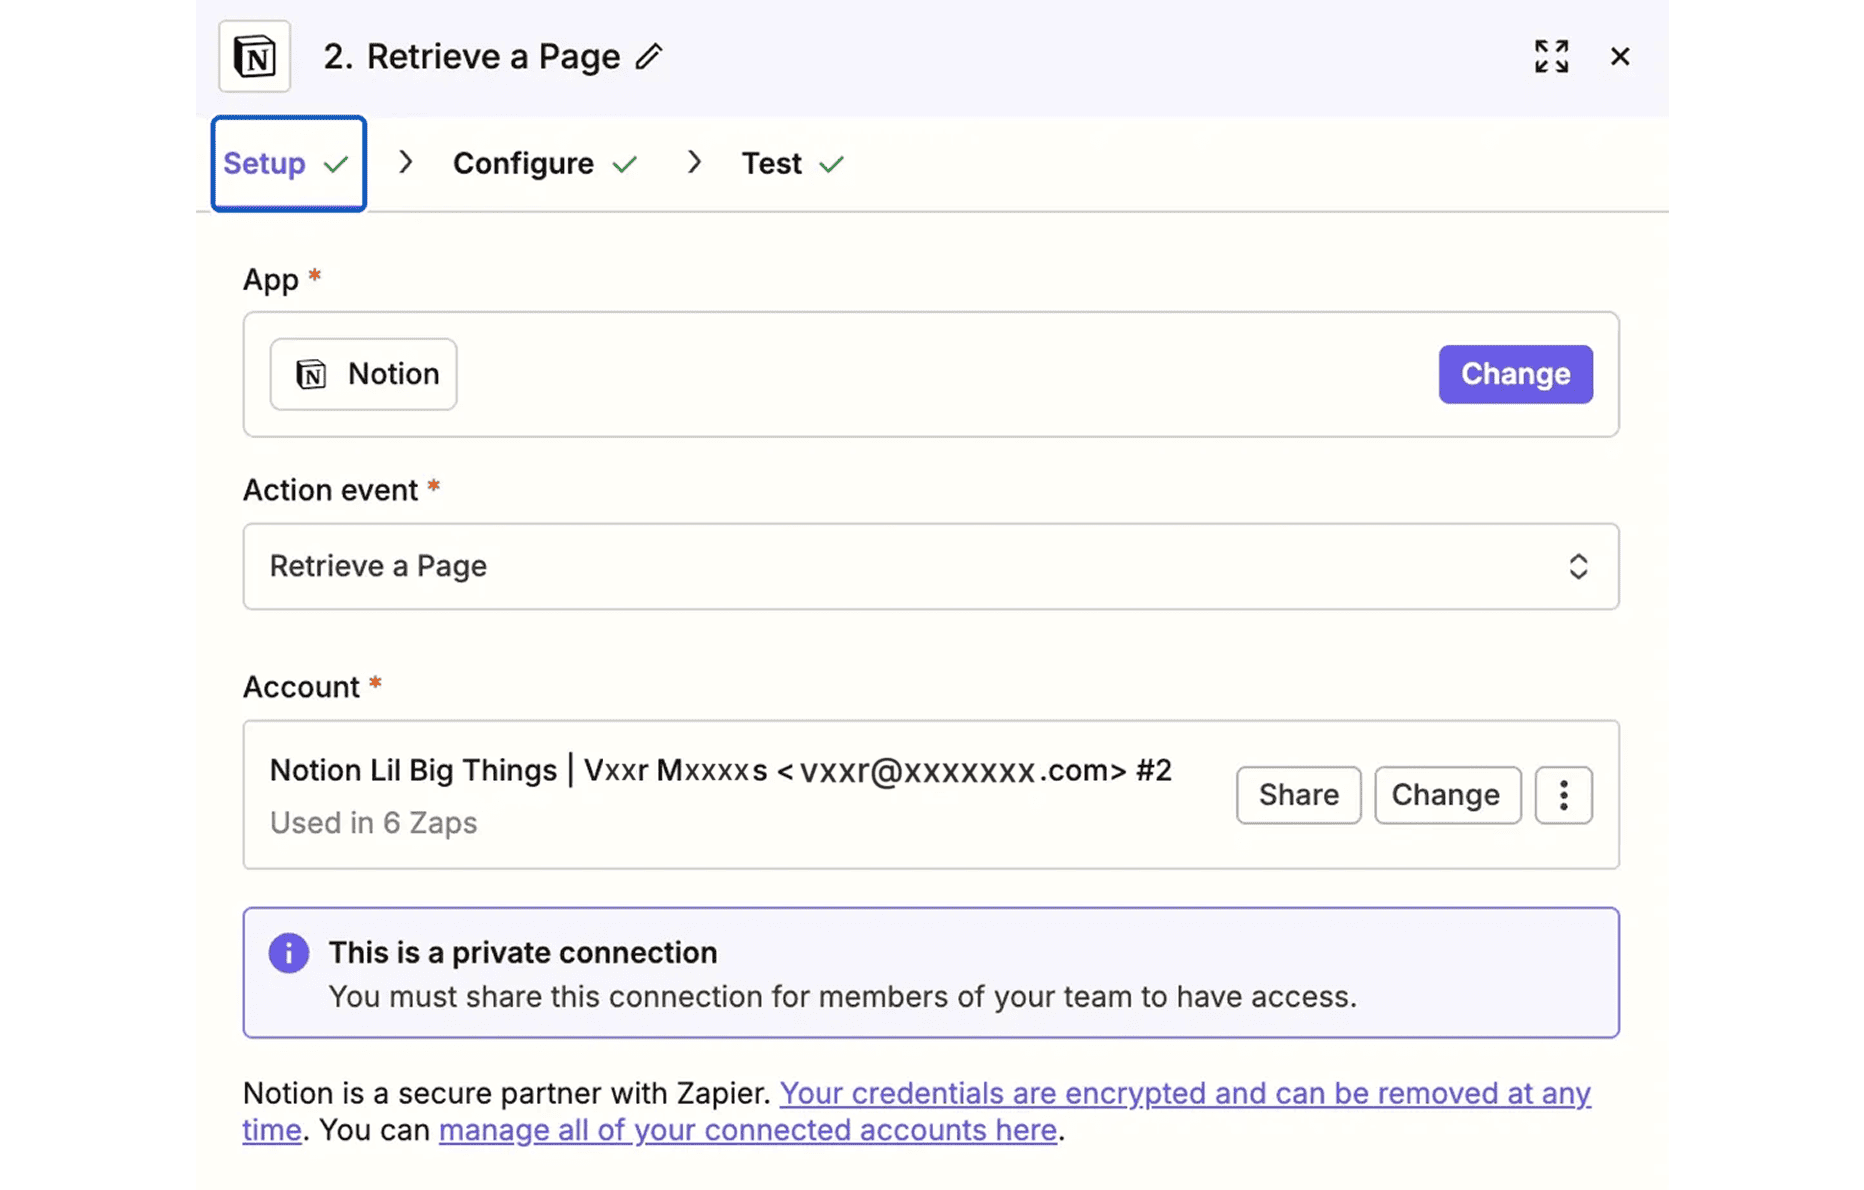
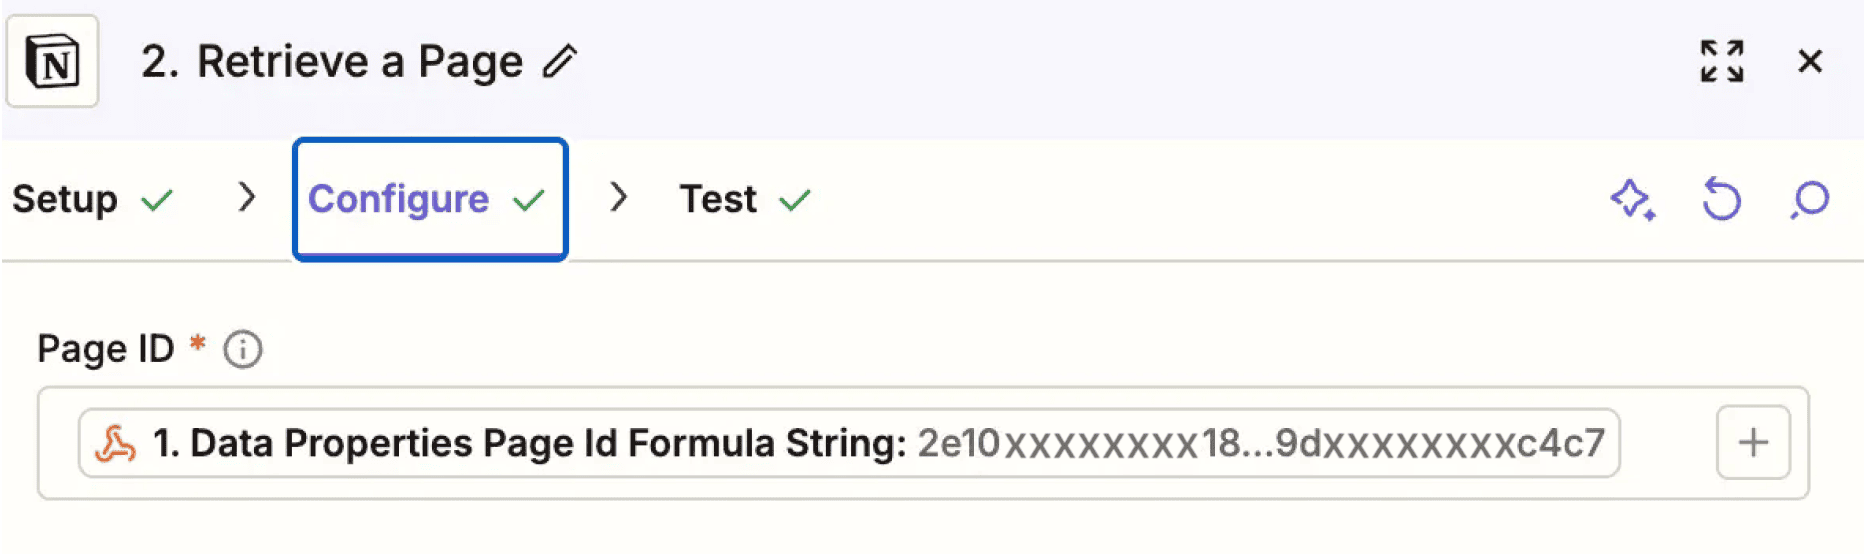
- Action: “Notion” → “Retrieve a Page”
- Connect Notion account
- Page ID: Select “1. Data Properties Page Id Formula String”
- Test: Should show full candidate data
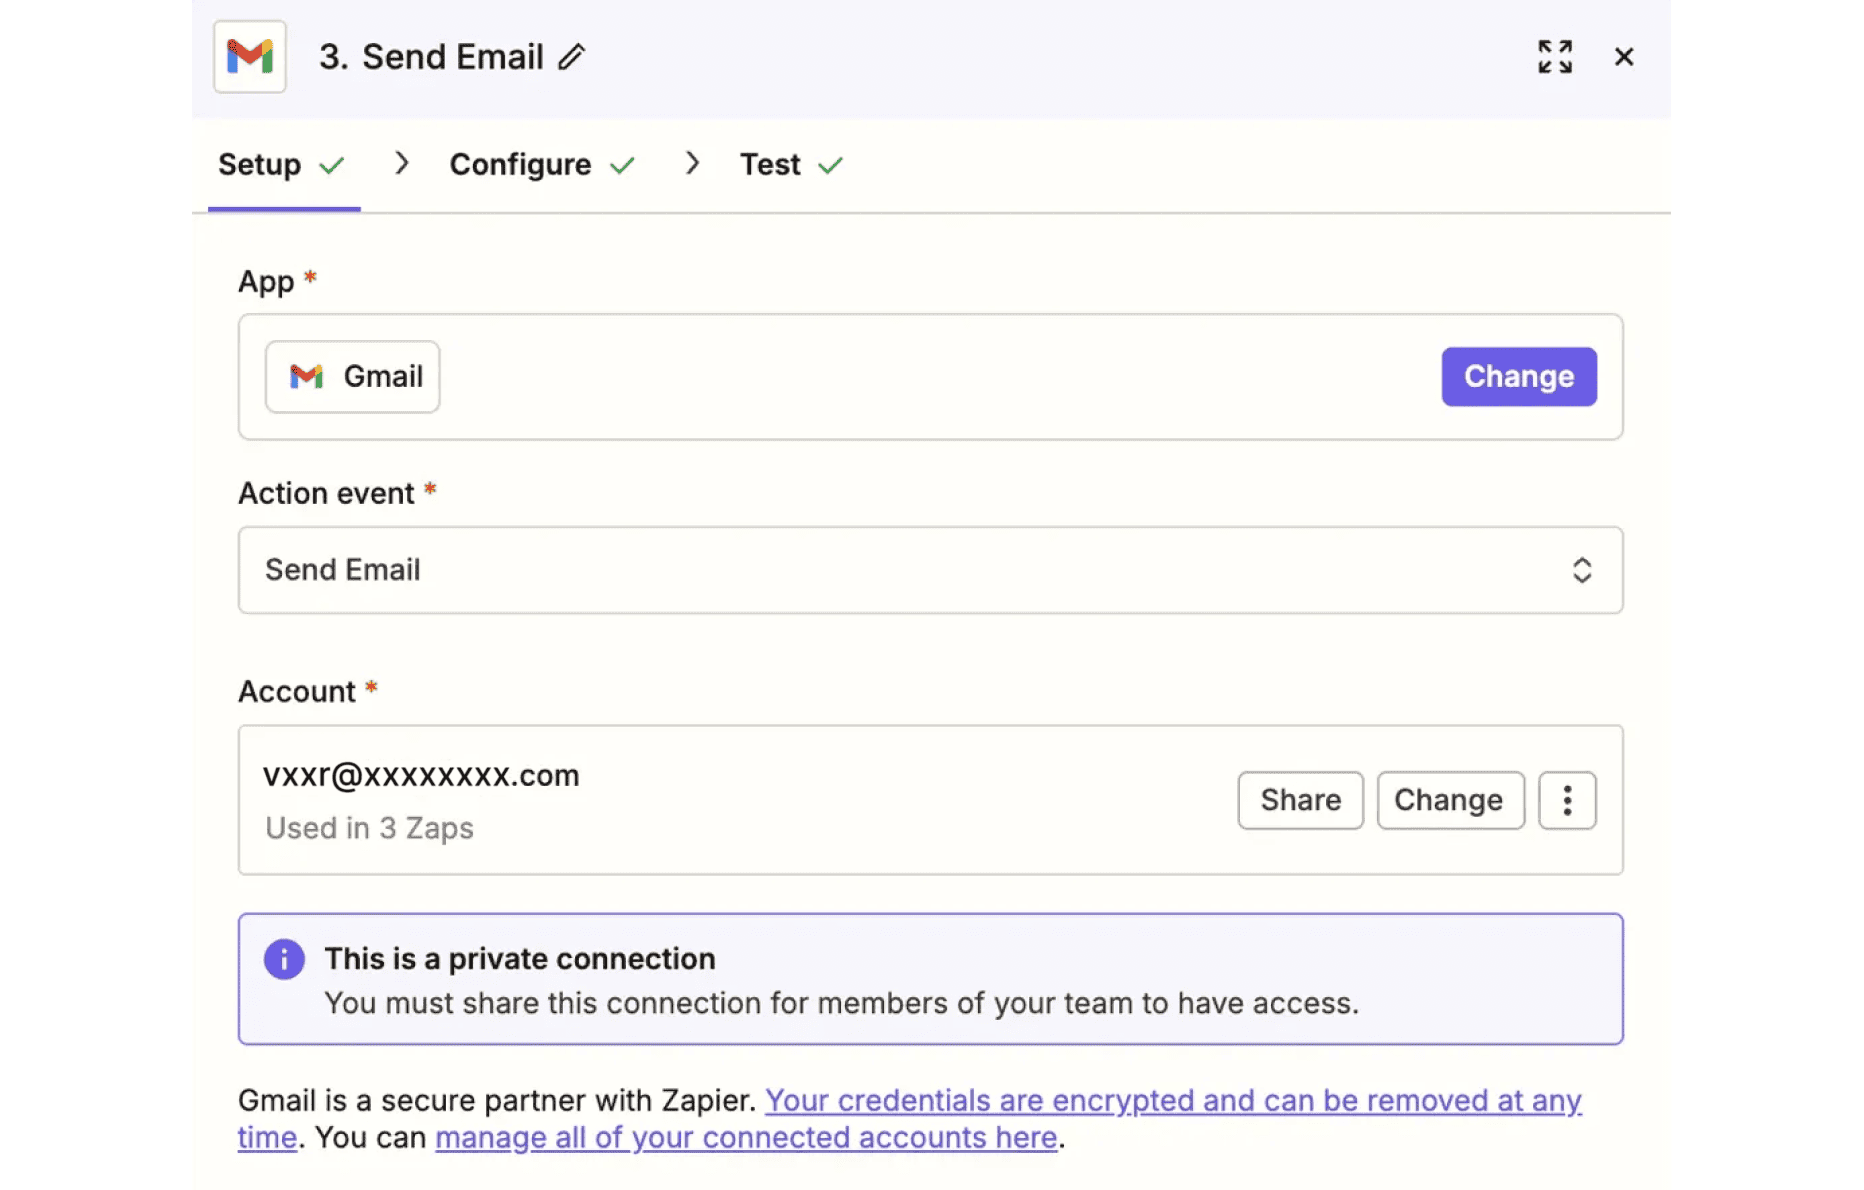
2.5 Step 3: Send Email (Gmail)
- Action: “Gmail” → “Send Email”
- Connect Gmail account
To: Map to “2. Properties Email Email”
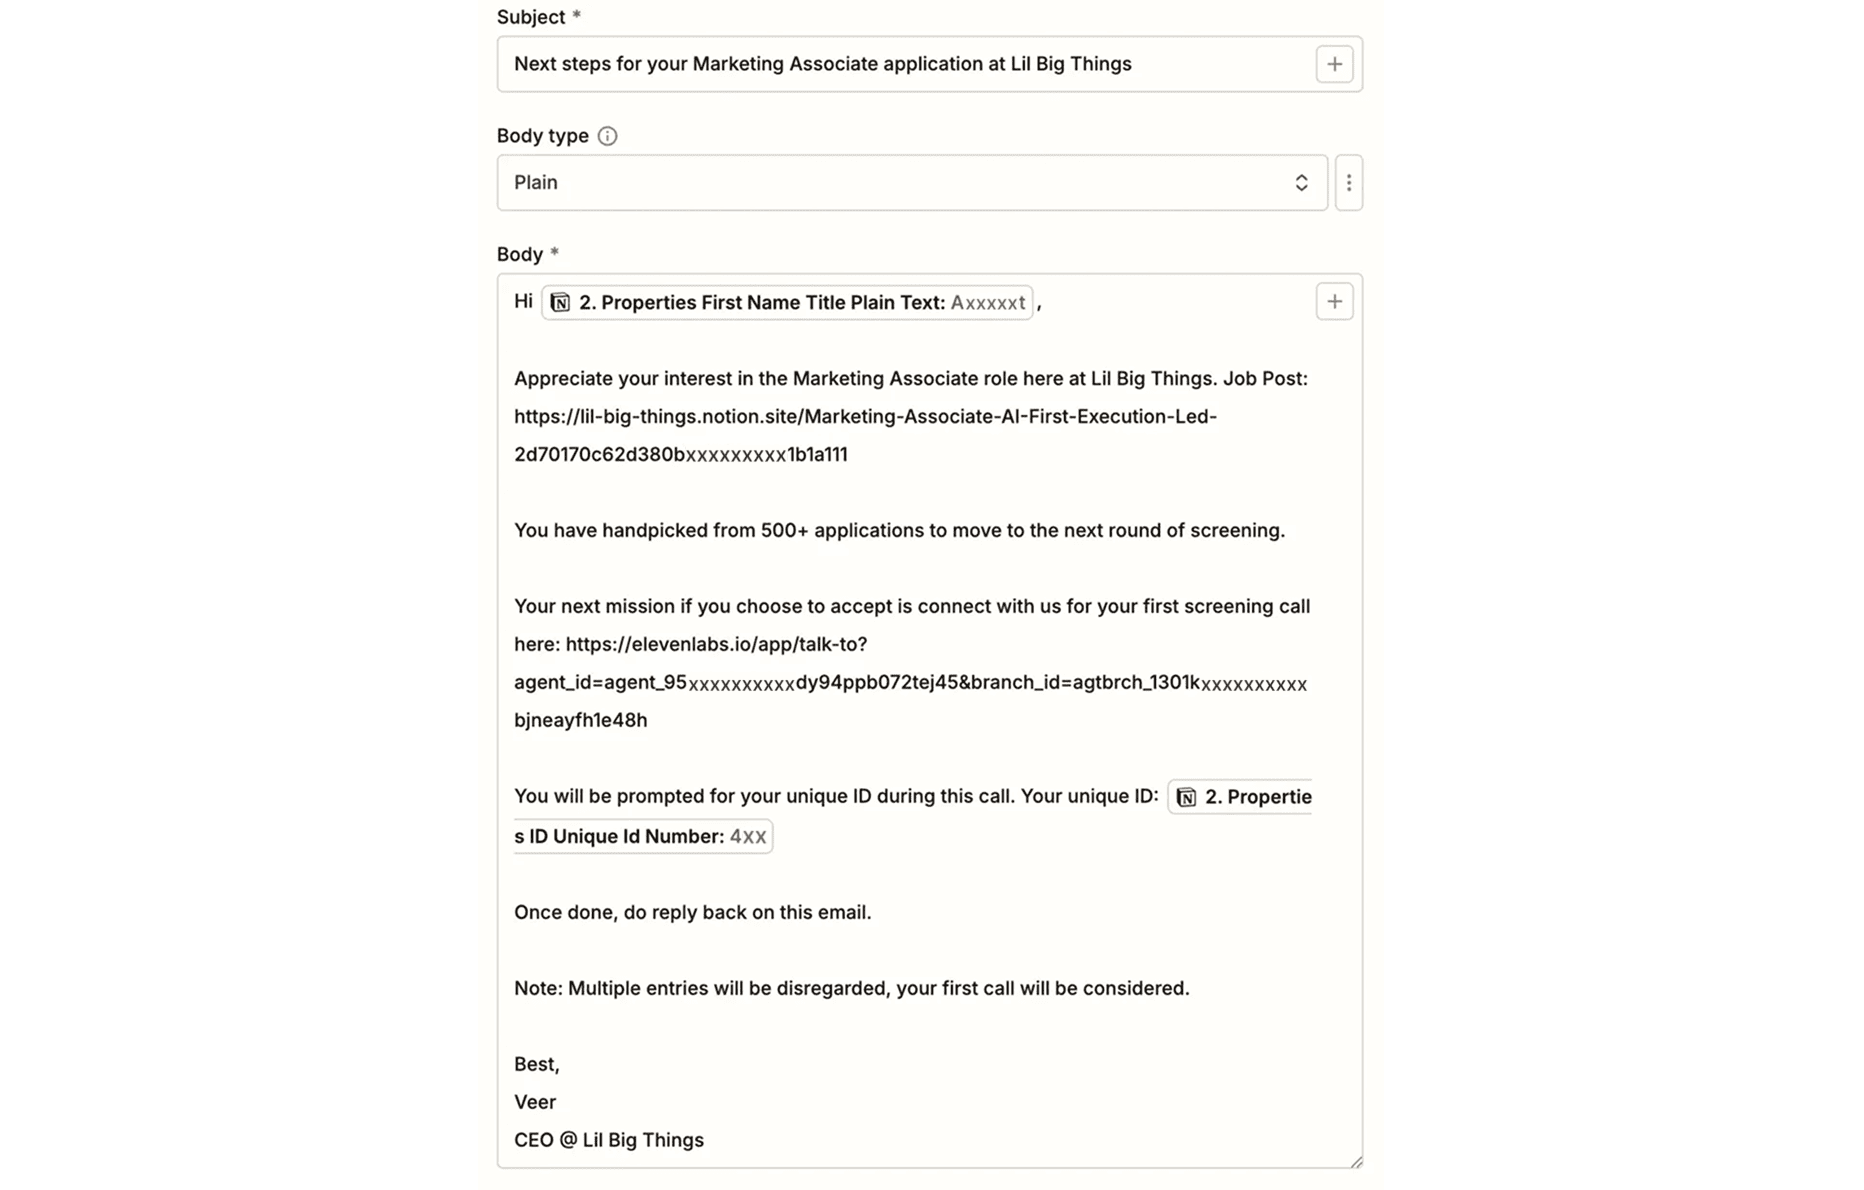
Subject:
Next steps for your [Position] application at [Company]
Body:
Hi {{First Name}},

You've been selected from 500+ applications for our screening round.

Complete your 10-minute screening call here:
[YOUR ELEVENLABS LINK]

When prompted, provide your unique ID: {{ID}}

Reply to this email once complete.

Best,
[Your Name]
[Company]
Map fields:
{{First Name}}: “2. Properties First Name Title Plain Text”{{ID}}: “2. Properties ID Unique Id Number”[YOUR ELEVENLABS LINK]: Your production link from Step 1
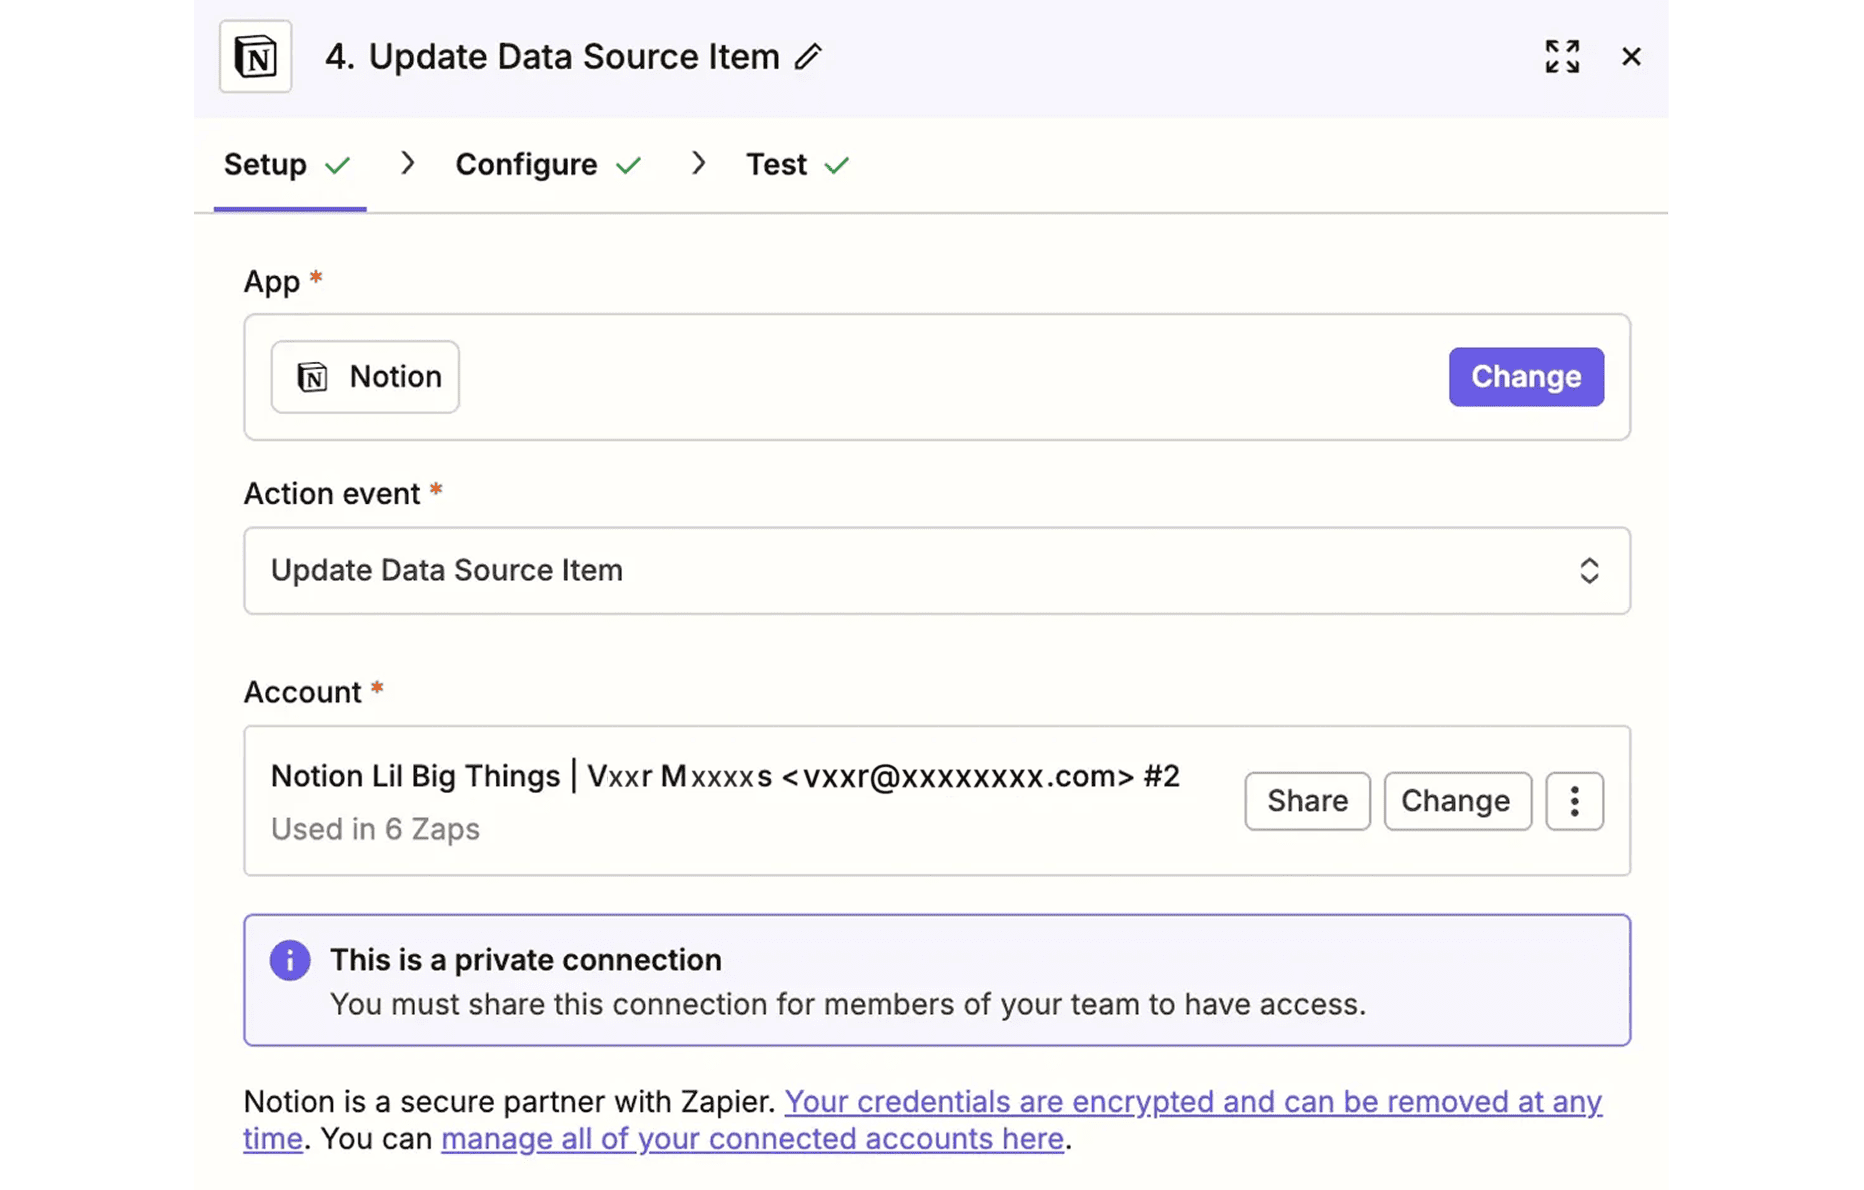
2.6 Step 4: Update Notion
- Action: “Notion” → “Update Data Source Item”
- Database: Candidate Pipeline
- Page ID: “1. Data Properties Page Id Formula String”
- Screening Email Sent: Set to True
- Leave all other fields EMPTY
2.7 Turn On & Test
- Click “Publish”
- Test full flow:
- Create test candidate in Notion
- Add “Send Email” button
- Click button
- Verify email arrives
- Click screening link
- Complete test call
- Verify Notion checkbox marked
Step 3: Daily Workflow & Review Process
3.1 Morning: Review New Applications
- Open Notion “New Applications” view
- Quick scan each application
- For rejects: Change Status to “Rejected”
- For good fits: Change Status to “Cleared for Screening”
Sanity check criteria:
- Basic qualifications met
- Resume shows relevant experience
- Not obviously overqualified/underqualified
- Location works (if relevant)
3.2 Midday: Send Screening Links
- Open Notion view: Status = “Cleared for Screening”
- For each approved candidate, click “Send Email” button
- Zapier automatically:
- Sends personalized email
- Marks checkbox as sent
- Candidate receives email within seconds
3.3 Afternoon/Evening: Candidates Complete Calls
- Candidates click link at their convenience
- AI conducts 10-minute screening
- Data collected in ElevenLabs
- No action needed from you
3.4 Review Completed Screenings
Where to review: ElevenLabs → Analysis tab
What you’ll see:
- List of all completed conversations
- Date, duration, status
- Expand each to see collected data (ID, Name, etc.)
- Access to full transcript
- Link to audio recording
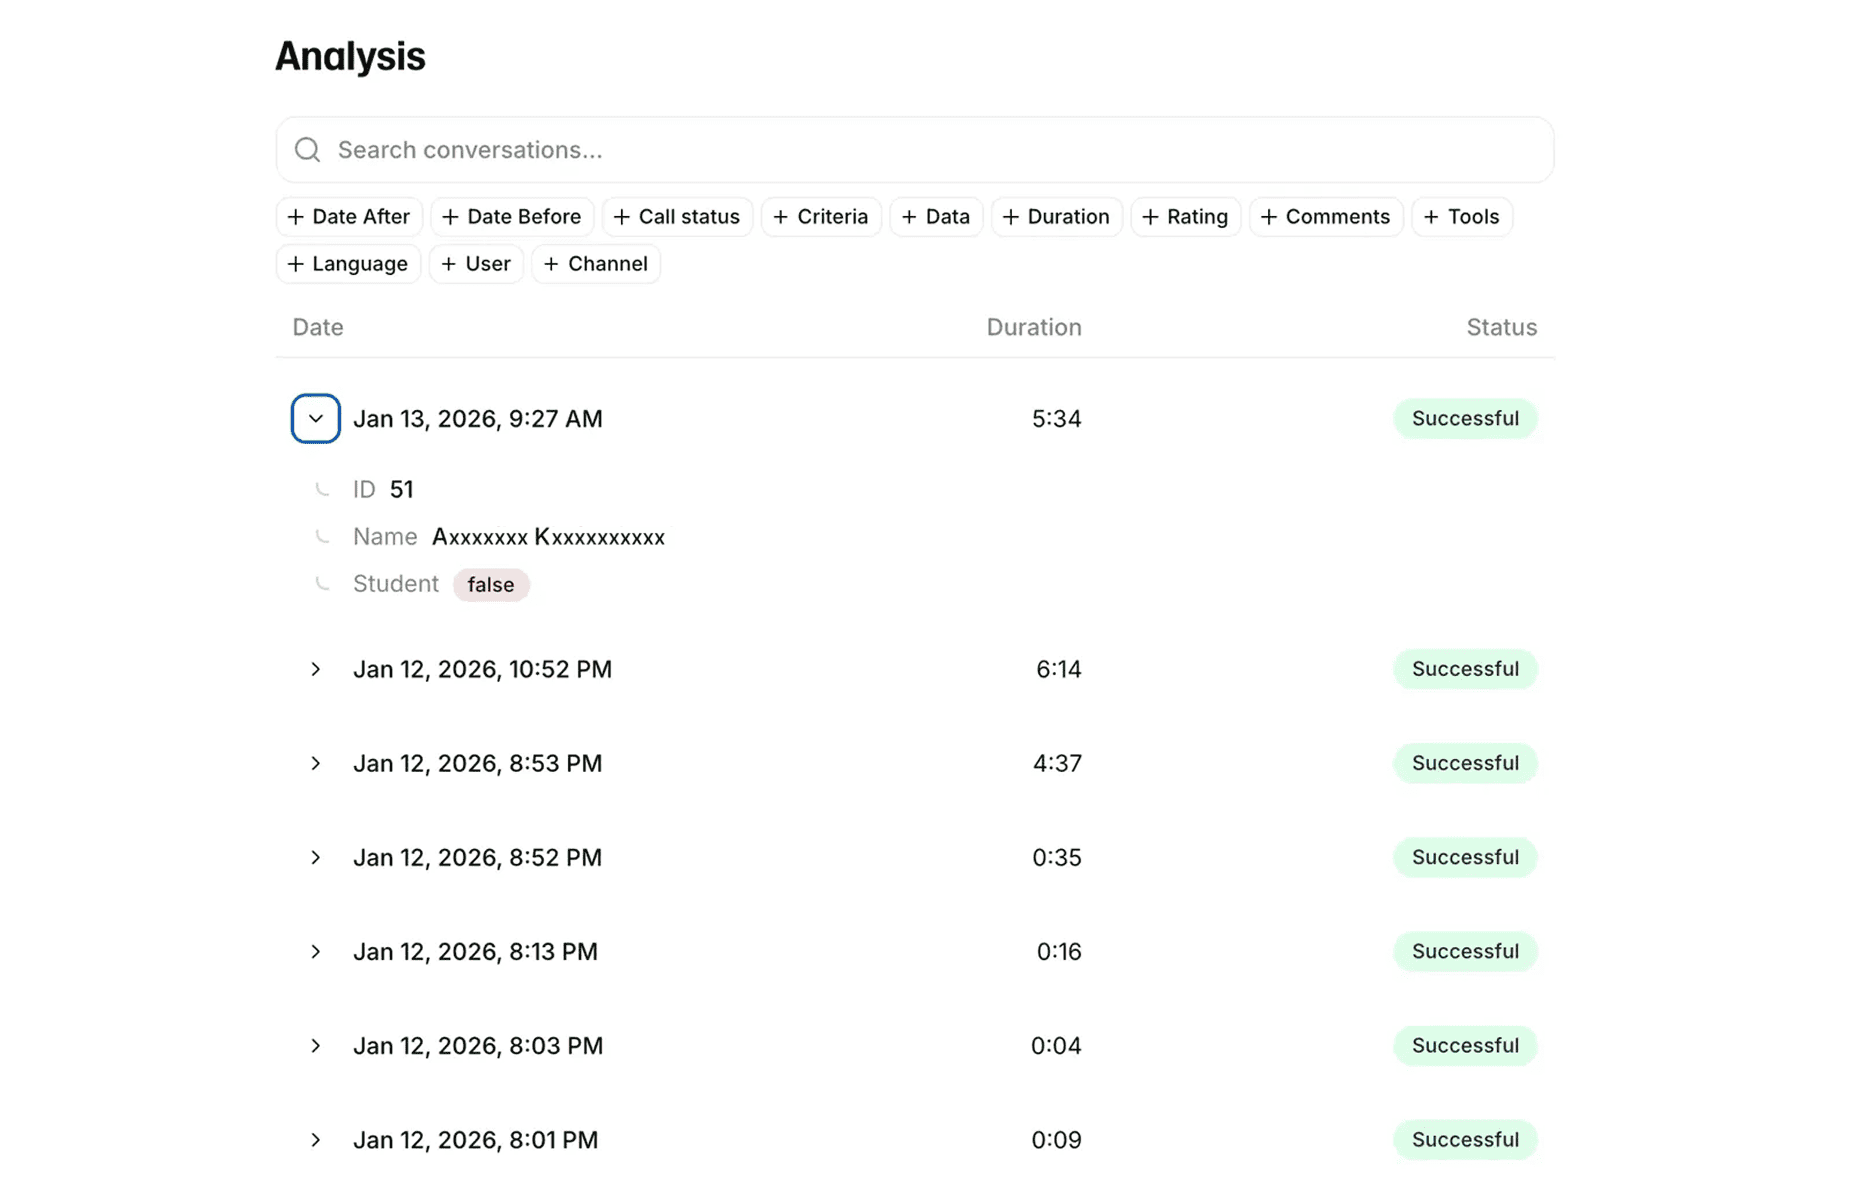
Review process:
- Quick filter: Look for recent calls (today/this week)
- Identify candidate: Check ID or Name data point
- Read AI summary: Look at conversation overview
- Scan transcript: Read key questions and answers
- Listen if borderline: Play recording for voice/communication assessment
- Make decision: Strong fit, maybe, or reject
Time per candidate: 3-5 minutes average
- Clear yes/no: 2-3 min (just transcript)
- Borderline: 5-10 min (listen to recording)
3.5 Optional: Track Decisions in Notion
If you want to track decisions back in Notion (manual process):
- Open candidate record
- Add field: “Screening Result” (Select)
- Strong Fit
- Maybe
- Rejected
- Add field: “Next Step” (Select)
- Send Assignment
- Schedule Interview
- Reject
- Add field: “Notes” (Text)
Update after reviewing each candidate in ElevenLabs.
3.6 Optional: Set Up Notifications
Get alerted when calls complete:
Option A: Email notifications from ElevenLabs
- Go to ElevenLabs Settings
- Enable email notifications for completed conversations
- Receive email with link to review
Option B: Slack notifications
- Connect ElevenLabs to Slack (if available in integrations)
- Get real-time alerts in a dedicated channel
Option C: Daily digest
- Check ElevenLabs Analysis once daily
- Review all new calls in batch
- More efficient for high volume
Troubleshooting
Webhook Not Triggering
- Verify webhook URL in Notion button
- Check page_id is selected
- Ensure Zap is ON
Email Not Sending
- Check Gmail connection
- Verify field mapping
- Check spam folder
Agent Sounds Robotic
- Try different voice
- Adjust stability to 85%
Agent Interrupts Too Much
- Set Eagerness to Low
Can’t Find Candidate in Analysis
- Check data collection points are configured
- Verify candidate provided ID during call
- Search by name or date
Cost Summary
ROI: 50+ hours saved × $100/hr = $5,000 value for ~$100 cost
Next Level: Want More Automation?
This hiring system is just the beginning. Apply this approach to:
- 📞 Customer discovery - AI user research interviews
- 🎯 Sales qualification - Automated lead screening
- 💬 Support triage - First-line inquiries
- 📊 Feedback collection - Scale insights gathering
Happy Building!